Many challenges come with astrophotography, but one of the most critical skills to master is achieving pinpoint star focus in your astrophotography images.
An astrophotography image with pin-sharp stars ensures that you maximise the hard-to-capture detail of faint deep-sky objects, such as nebulae and galaxies. Some of this fine structure and detail will be missed if you are not in perfect focus.

The North America and Pelican Nebula in Cygnus are filled with fine structure and beautiful detail, by Mike Soulby © stellardiscovery.com
There are several ways to achieve perfect star focus, and in this post, I will share the star focusing methods that have helped me with my astrophotography images.
Importance of Sharp Star Focus
If like me, you have limited clear skies or not much time to capture your intended target, then you need to make sure you are in focus before you execute your exposure plan.
Taking that little extra time to ensure your image is sharp and focused will reduce the frustration of seeing an otherwise good image ruined.
Consider the three images of emission nebula NGC7822 below; by applying a lens blur effect in photoshop, it is possible to simulate what the image would look like if you are out of focus.
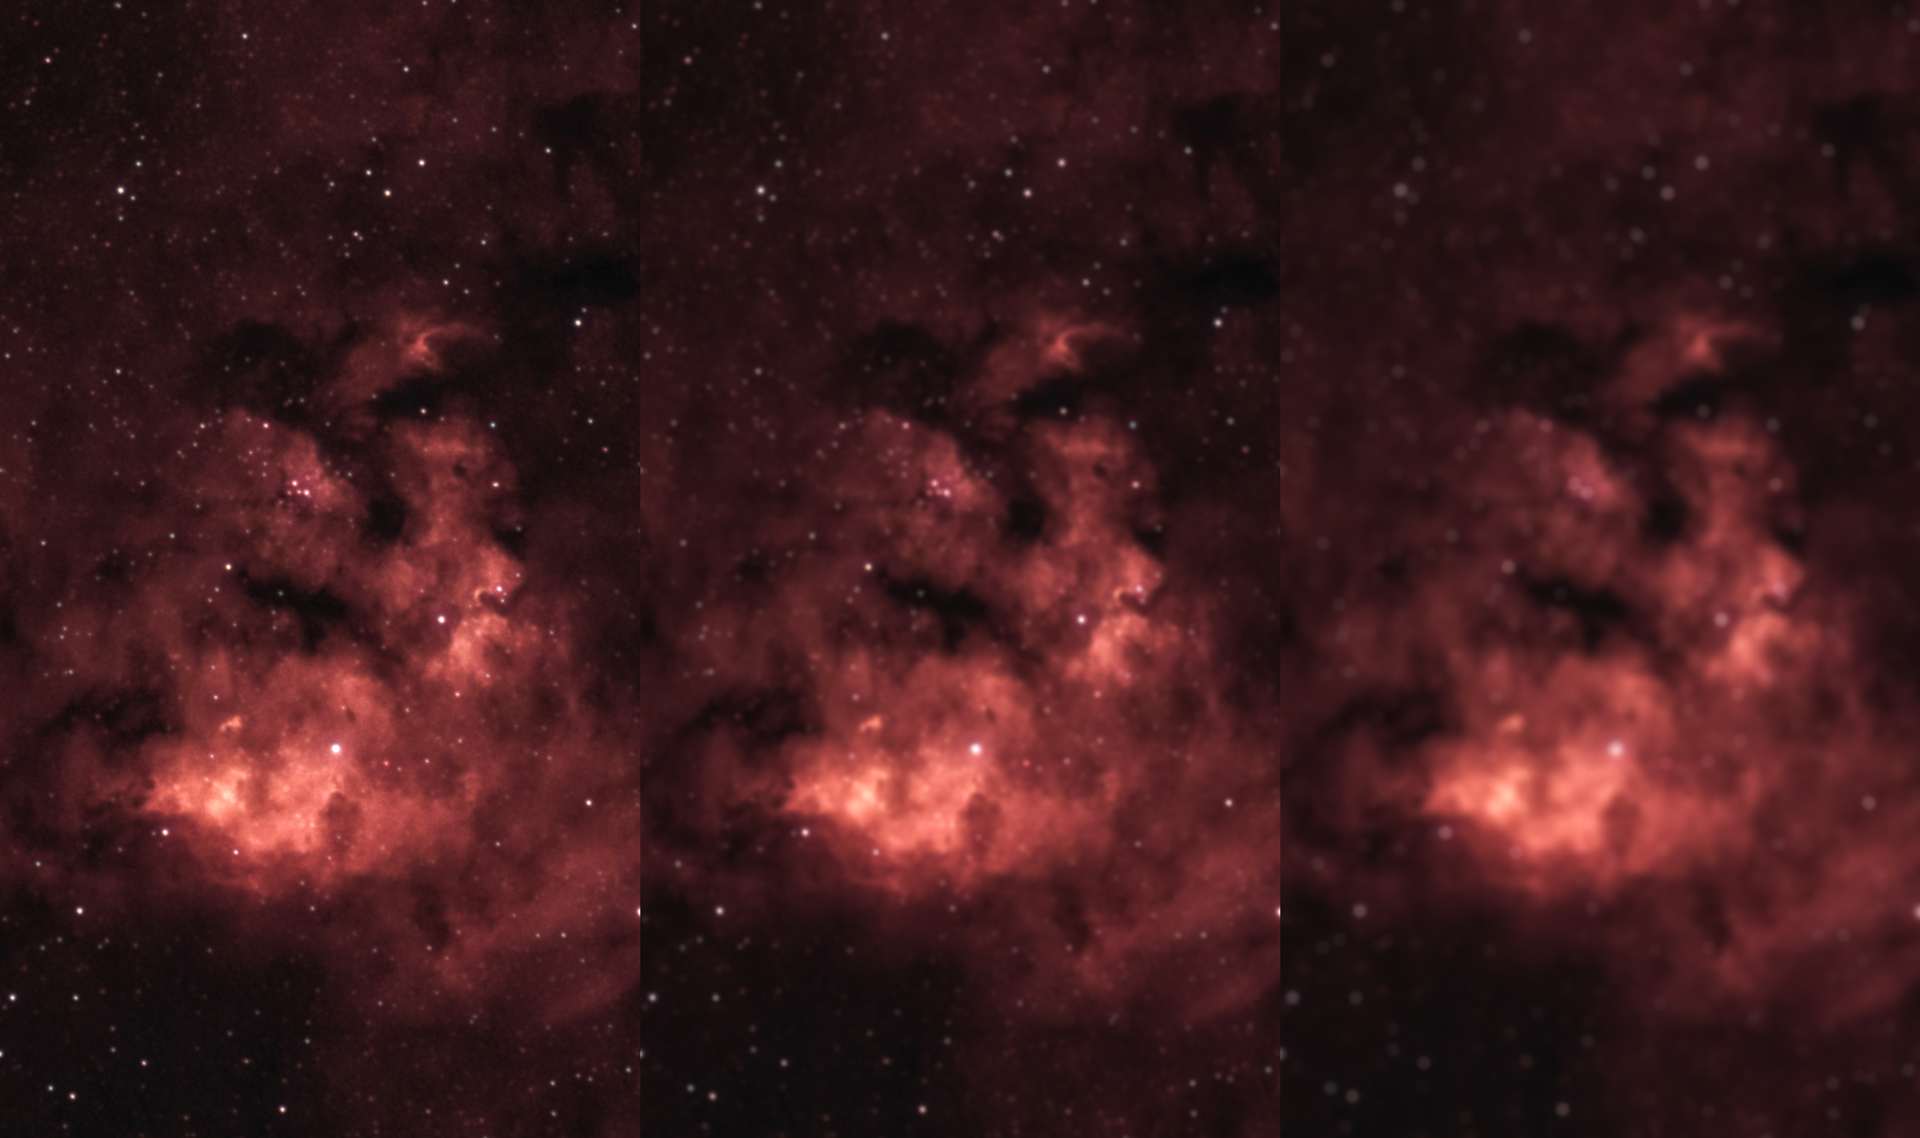
NGC7822 in Cepheus, with increasing defocus from left to right, by Mike Soulby © stellardiscovery.com
The image on the left is in focus. The stars are sharp and appear small in the image. A good amount of detail is shown in the nebula, with lots of fine structure and contrast visible.
The image in the middle was defocused slightly. The very fine details of the nebula are softened and begin to be lost in this image; it now lacks the same ‘punch’ that the in-focus image delivers.
The image on the right has a more significant defocus applied. The effect is quite severe; stars are bloated and appear fainter, with some of the fainter stars disappearing entirely from the image. The nebula details have been significantly lost, and this image is not usable.
A Look at Focusers
Most of the time, focusing in astrophotography is a manual process that requires you to adjust the focus by hand. This process typically involves adjusting a focusing ring or a focusing knob.
Both DSLR lenses and telescopes are commonly used for astrophotography, so I will run through some of the features and differences you will likely encounter.
DSLR Camera Lens Focusing Ring
Focus is adjusted using a focusing ring around the lens housing. The focusing ring is usually a ridged rubberised material making it easy to grip and rotate; a couple of examples are shown in the images below.
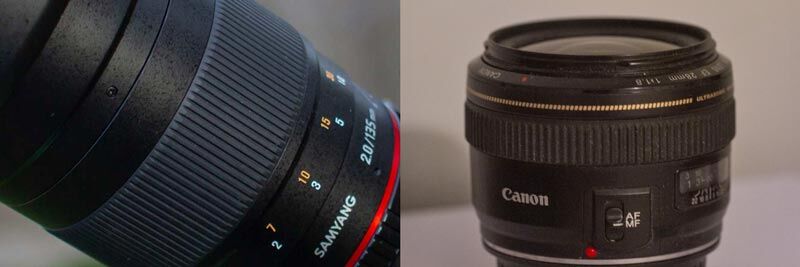
The movement of the focusing elements within a DSLR lens is internal, and you won’t see the lens elongate or move whilst you adjust the focus.
There is no fine focus ability on most DSLR lenses, so adjustment can sometimes be a bit coarse. It may involve a bit more trial and error; however, with some patience and a deft touch, you can still easily achieve sharp star focus.
One final thing about DSLR lenses is there is often no focus lock. I have never found this to be an issue with half-decent lenses, and unless you knock the focuser, it will remain in position.
Telescope Focuser
Telescope focusers have a focusing knob that you turn to adjust the focus.
As the knob is adjusted, the telescope’s optical tube assembly will move in or out, physically changing the length of the telescope and with it the distance from the objective lens to the eyepiece or camera sensor.
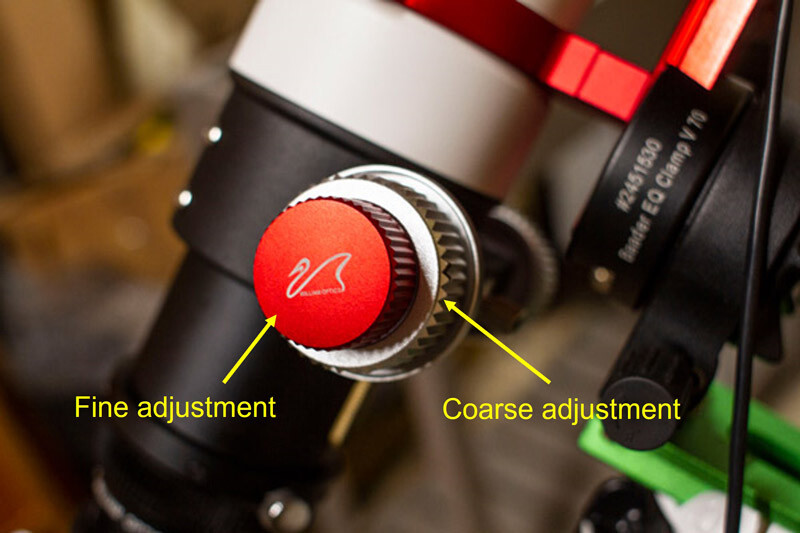
There are many different focusers on the market, but most good ones will have coarse and fine adjustment dials, similar to those on my William Optics Zenithstar 73, shown above.
The coarse adjustment is usually the larger inner dial and allows for quick movement if you need to move the focuser a long distance.
The fine adjustment is usually the smaller outer dial. The fine focus will typically give you a 10:1 reduction, giving you excellent resolution and precision for finding the exact focal point.
There is also often a focus locking screw on telescope focusers that you can tighten to fix your focus position.
A Look at Focusers
Most of the time, focusing in astrophotography is a manual process that requires you to adjust the focus by hand. This process typically involves adjusting a focusing ring or a focusing knob.
Both DSLR lenses and telescopes are commonly used for astrophotography, so I will run through some of the features and differences you will likely encounter.
DSLR Camera Lens Focusing Ring
Focus is adjusted using a focusing ring around the lens housing. The focusing ring is usually a ridged rubberised material making it easy to grip and rotate; a couple of examples are shown in the images below.

The movement of the focusing elements within a DSLR lens is internal, and you won’t see the lens elongate or move whilst you adjust the focus.
There is no fine focus ability on most DSLR lenses, so adjustment can sometimes be a bit coarse. It may involve a bit more trial and error; however, with some patience and a deft touch, you can still easily achieve sharp star focus.
One final thing about DSLR lenses is there is often no focus lock. I have never found this to be an issue with half-decent lenses, and unless you knock the focuser, it will remain in position.
Telescope Focuser
Telescope focusers have a focusing knob that you turn to adjust the focus.
As the knob is adjusted, the telescope’s optical tube assembly will move in or out, physically changing the length of the telescope and with it the distance from the objective lens to the eyepiece or camera sensor.
There are many different focusers on the market, but most good ones will have coarse and fine adjustment dials, similar to those on my William Optics Zenithstar 73, shown above.
The coarse adjustment is usually the larger inner dial and allows for quick movement if you need to move the focuser a long distance.
The fine adjustment is usually the smaller outer dial. The fine focus will typically give you a 10:1 reduction, giving you excellent resolution and precision for finding the exact focal point.
There is also often a focus locking screw on telescope focusers that you can tighten to fix your focus position.
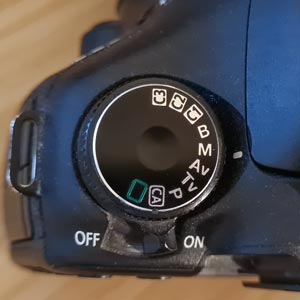 Step 1 – Switch to manual mode ‘M’.
 Step 2 – If using a DSLR lens, ensure manual focus is selected ‘MF’. This setting is often found on the lens rather than the camera body.
Also, disable any image stabilisation if your lens has this feature.
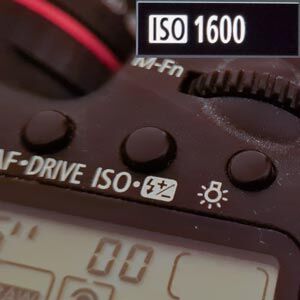 Step 4 – Set the ISO to 1600 or 3200. Increasing the ISO will increase the camera sensor’s signal gain, making the image brighter, which is ideal for low light images.
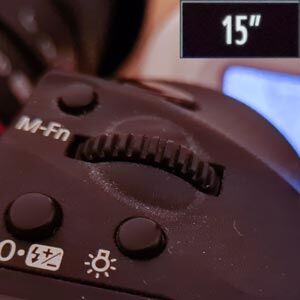 Step 5 – Adjust the exposure length to between 10 and 20 seconds. On Canon DSRL cameras, this is done using a wheel adjuster near the shutter button.
These settings will help ensure the live view preview image is as bright as possible. It is also a good setting if you want to take a test shot to check your focus in more detail.
 Step 6 – Switch to ‘Live View’ mode.
 Step 7 – When focusing on stars, it is first worth moving the focuser into roughly the correct focusing range.
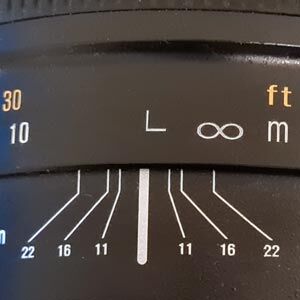
a) For a DSLR lens, move the focus position to infinity (move it towards the end with the ∞ symbol).
b) For a telescope, you can first focus on a distant street lamp if you are unable to see any stars and are not sure where the focal position is.
These initial focus positions will help you avoid a situation where you are too far out of focus that stars become difficult to view on the live view screen.
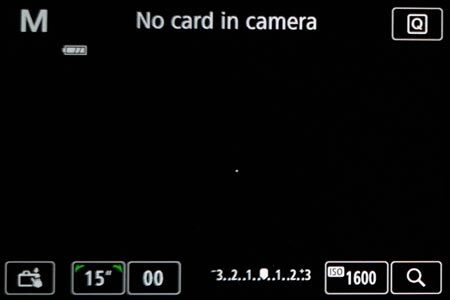
Step 8 – Move your mount or tripod to find and centre a bright star. In the image here, you can see the star as a small white dot near the centre of the viewscreen. Centre the star as best you can.
Step 8 – Move your mount or tripod to find and centre a bright star. In the image here, you can see the star as a small white dot near the centre of the viewscreen. Centre the star as best you can. 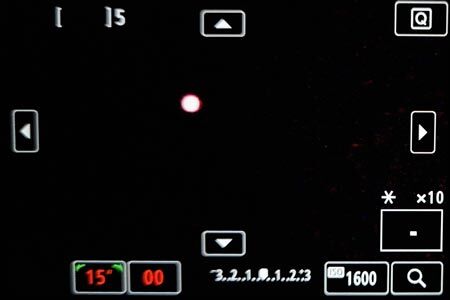
Step 9 – Once centred, use the live-view magnifier feature to enlarge the live image to either x5 or x10 times.
You may need to reposition the star to keep it in the centre of your view using your camera’s arrow keys. Once centred and magnified, you can begin to refine the focus.
In the image shown here, you can see that the star is bloated and not in focus.
Step 10 – As you adjust the focus, the aim is to make the star as small as possible. You will need to move in and out of focus a few times to help you decide when the star is as small as you can make it; see the image sequence below for an illustration.

As you approach the focal point, you may start to see fainter stars pop into view; this is a good indication you are on the right track.
Once you are happy that you have the star as small as you can make it, that’s it. You will now be in focus.
This straightforward method delivers good sharp stars with minimal effort and no additional kit. For many of my images, this is how I will set the focus, particularly for wide-angle shots using shorter focal length lenses.
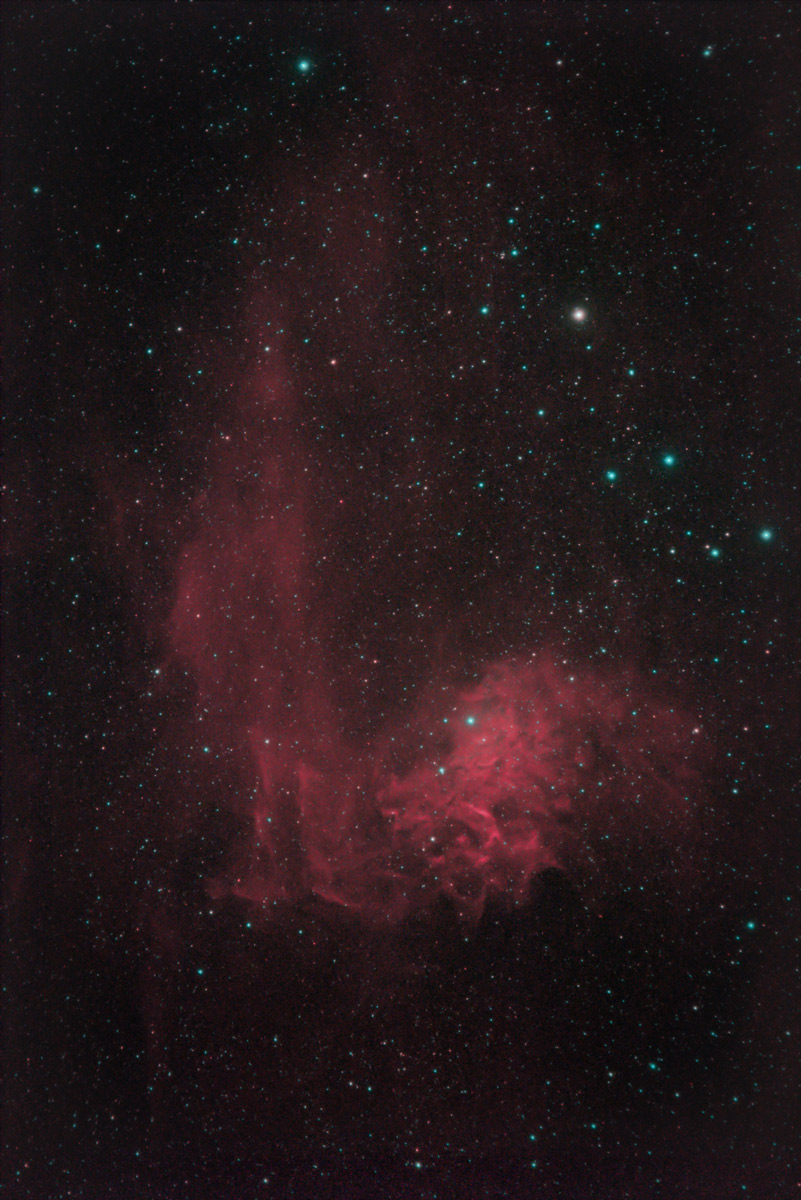
The Flaming Star Nebula in Auriga has some fascinating structure, by Mike Soulby © stellardiscovery.com
How to Focus a Telescope Using a Bahtinov Mask
The Bahtinov Mask is a popular and easy to use star focusing mask.
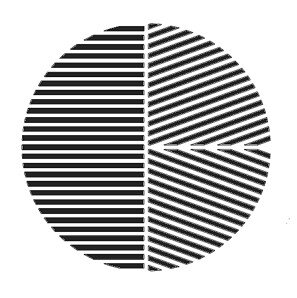
Invented by Pavel Bahtinov as recently as 2005, the Bahtinov focusing mask consists of three gratings: one with horizontal slits, one with slits angled about +25° from horizontal, and one with slits angled about -25° from the horizontal. The image below shows the typical Bahtinov mask pattern.
When light from a star passes through a grating of regularly spaced lines, it creates a very pronounced diffraction spike perpendicular to the direction of the grating lines.
The combination of the three different grating orientations on the Bahtinov mask creates three distinct diffraction spikes. Two diffraction spikes create an X shape, and a third central diffraction spike bisects the X, as shown in the image below.
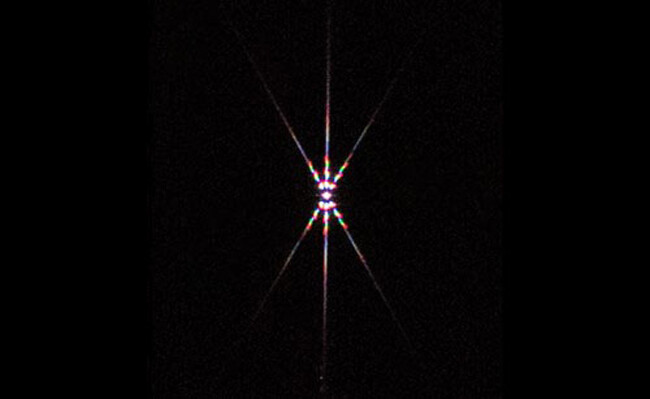
The distinctive diffraction pattern of an in-focus star created by a Bahtinov mask.
As you adjust the focus of your lens or telescope, the central diffraction spike will move from side to side between the two X-shaped diffraction spikes. Even small focus adjustments will cause the central spike to shift noticeably.
When a star is in perfect focus, the central spike will be positioned exactly between the two X spikes.
The human brain is very good at recognising when the central spike is positioned precisely between the X spikes; this means your focus can be confirmed very quickly and with a high degree of accuracy.
This combination of focus sensitivity, accuracy, ease of use and low cost is why the Bahtinov mask is so widely used throughout the astrophotography community.
How to use a Bahtinov Mask
To achieve perfect focus using the Bahtinov mask, I would first recommend running through the camera’s live view focusing sequence outlined above, without the Bahtinov mask fitted. This method will get you very close to the correct focus, so all that is needed from here is confirmation or refinement.
Place your Bahtinov mask over the end of your camera lens or telescope objective.
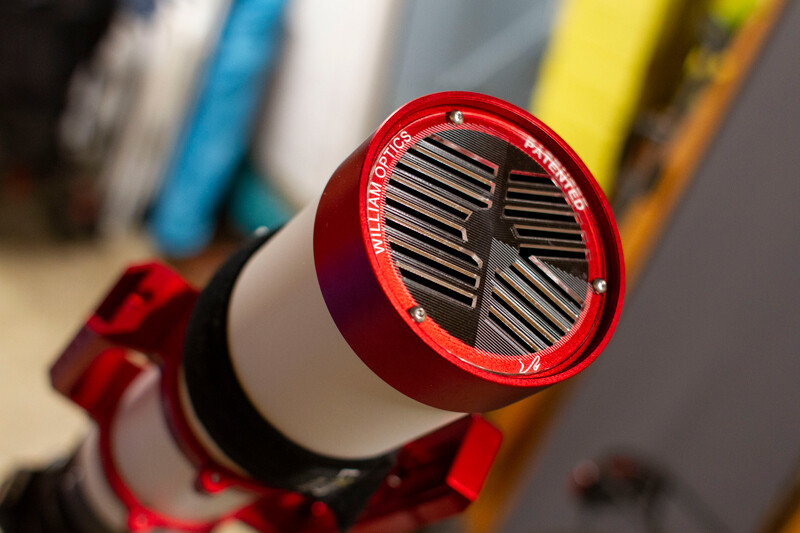
The Williams Optics Zenithstar 73 comes with a Bahtinov Mask integrated into the lens cap.
The Bahtinov mask will reduce the brightness of the star you are trying to focus on as it diffracts and spreads the light from a single point into three diffraction spikes. Therefore, if you haven’t already, I recommend using a bright star to help make things easier.
If the star you are focusing on is bright enough, you should now see the characteristic diffraction pattern on the live view screen.
By adjusting the focus carefully, you will see the central spike move in relation to the ‘fixed’ X spikes, similar to the image sequence below.

I will often run the focusing back-and-forth through the focal point a few times to help me get a ‘feel’ for when the spike hits the exact centre point.
Once you are happy that the central diffraction spike is exactly between the X spikes, that’s it. You are in focus!
Now remove the Bahtinov mask and, if possible, lock your focuser. You will now be focused and ready to frame up your imaging target.
Which Bahtinov mask do I need?
There are two main things to consider when choosing a Bahtinov mask.
1) What is the focal length of your camera lens or telescope?
The width of the slits should be matched to the focal length of the telescope or camera lens you are using; this will help create the best possible diffraction spikes for your setup.
The grating pattern will have wider slits for long focal lengths and a narrower, more tightly spaced pattern for short focal lengths.
The Bahtinov mask for my Samyang 135mm DSRL lens below has very narrow slots designed for the short 135 mm focal length.
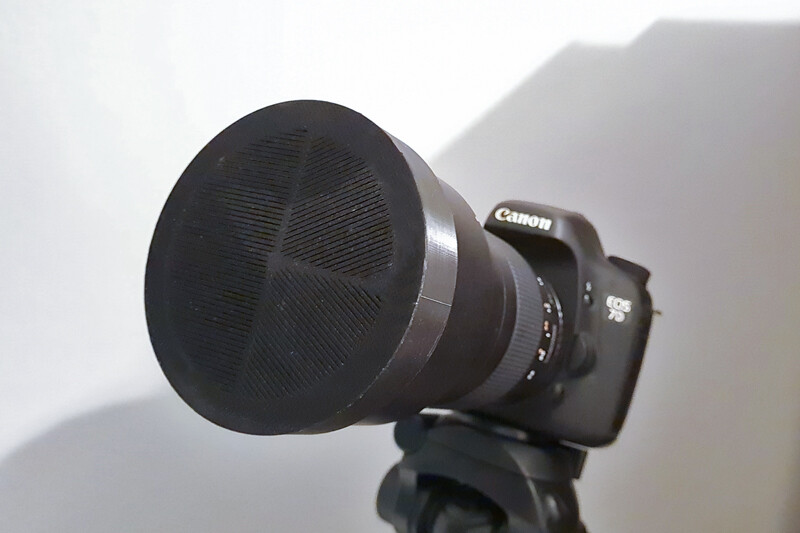
This 3D printed Bahtinov mask was designed for the Samyang 135mm DSLR lens and fits nicely over the lens hood.
2) What is the diameter of your main objective lens tube?
You will need to make sure that the focusing mask fits correctly over the end of your lens or telescope.
The outer diameter of the telescope tube (not the objective lens) should be measured, and a suitably sized mask chosen to fit over the end.
Many of the standard Bahtinov Masks available allow you to adjust the size by moving adjustable pins along a slot. This ensures a secure fit around your telescope tube, simply find the size that fits your telescope (affiliate links).
For outer tube diameters from 85mm-120mm
For outer tube diameters from 105mm-150mm
For outer tube diameters from 125mm-180mm
For outer tube diameters from 195mm-240mm
For outer tube diameters from 215mm-260mm
To access the Bahtinov Aid in APT, select the ‘Tools’ tab on the right-hand side of the main display and select it from the list. A small pop-up window will appear, and in the available fields, you should enter your setup focal length, objective diameter and camera pixel size.
The window can be dragged around the image preview screen. Inside the window is a crosshair, move the window so that the crosshair lines up with the centre of a star’s diffraction pattern, see left image below.

Once aligned, hit the ‘Recalc’ button. APT will now display an overlay over the diffraction pattern and let you know how close you are to being in focus.
When adjusting your focus, the aim is to get the focus distance number as close to zero as possible.
There are also two circles (blue and red) in the top right of the Bahtinov Aid window. As you adjust your focus, the red circle will move around; when the red circle overlaps the blue circle you will be in focus. This is a more intuitive way to monitor the focus rather than watching the focus distance number, which can bounce around a bit, especially if there is poor seeing.
Star Focusing when using filters
If you are using a filter, it is important to focus your camera lens, or telescope whilst the filter is fitted.
Placing a filter in the optical train will affect the focus position. The additional piece of filter glass refracts the light at its front and rear surfaces pushing the focal point away from your objective by a small amount.
Astrophotography filters will also drastically reduce the amount of light that reaches your camera’s sensor, particularly narrowband filters.
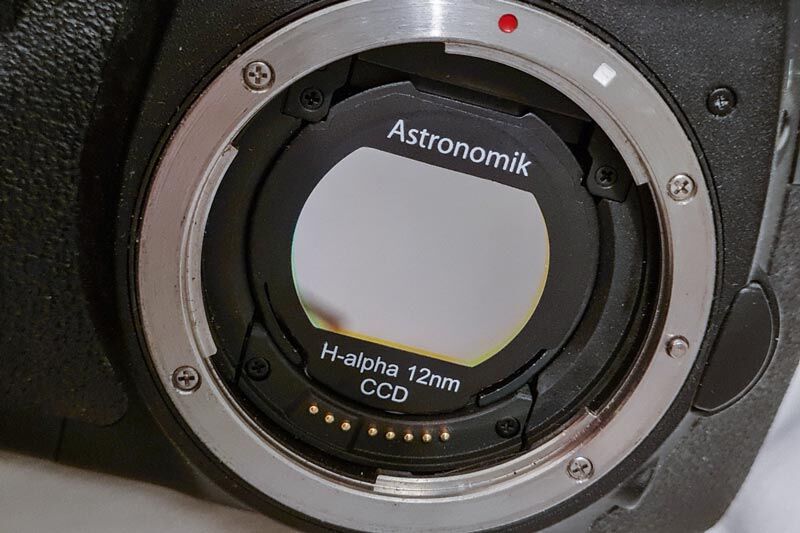
Filters, particularly narrowband filters like this 12nm H-alpha filter, will make focusing more challenging.
This reduction in light transmission will make using the live view feature to focus very difficult, if not impossible, even with a bright star in the centre of your view.
To overcome this, you will need to take a series of test exposures to confirm that you are in focus and the diffraction spikes are correctly aligned.
Suggested test exposure settings:
- Fully Manual Mode – ‘M’
- ISO: 1600 or 3200
- Exposure length: 10-20 seconds
These settings are usually enough to reveal the diffraction spikes if you use a bright star. If the image is still faint using these settings, you can increase the exposure length.
Between each test exposure, you will need to check the image and adjust the focuser to refine your focus if necessary.
With filters fitted, this process can take a little time before you get the focus exactly right. It is worth remembering which direction you adjust the focuser each time; otherwise, you could end up going back and forth without realising. I have done this many times and still sometimes forget.
Final Focus Check
Before hitting GO on your exposure plan, it is worth taking a few final test shots to double-check that you are completely happy with your focus.
To do this, pan to your intended deep-sky target and frame up your shot.
Now take a test shot at your planned exposure length (if you are using a tracking mount, you should, of course, be polar aligned and have tracking enabled).
Once complete, you should review the shot in detail. Use the magnifier feature on your camera or view the image on your laptop. Pan around the image and carefully check that the stars are pin-sharp when viewed at 100% zoom.
If everything checks out, you can start your exposure plan and then head back inside for a warm drink whilst your camera is snapping away.

The Sadr region in the constellation Cygnus, by Mike Soulby © stellardiscovery.com
0 Comments