Partial Solar Eclipse - March 29th 2025
The partial solar eclipse on 29th March 2025 occurred in the northern polar regions, with the centre of the Moon’s shadow narrowly missing Earth.
At maximum coverage, the UK saw about 30% to 40% of the Sun’s surface covered, depending on your exact location, with the western UK seeing the greatest coverage.
In other parts of the world, such as the northeastern United States, eastern Canada, Greenland, and Iceland, over 90% of the Sun’s surface was covered at maximum, making this partial solar eclipse much more dramatic as it came very close to a total solar eclipse.
Full details of the eclipse can be found on the time and date website, which includes timings and maps outlining the path and coverage during the partial solar eclipse https://www.timeanddate.com/eclipse/solar/2025-march-29
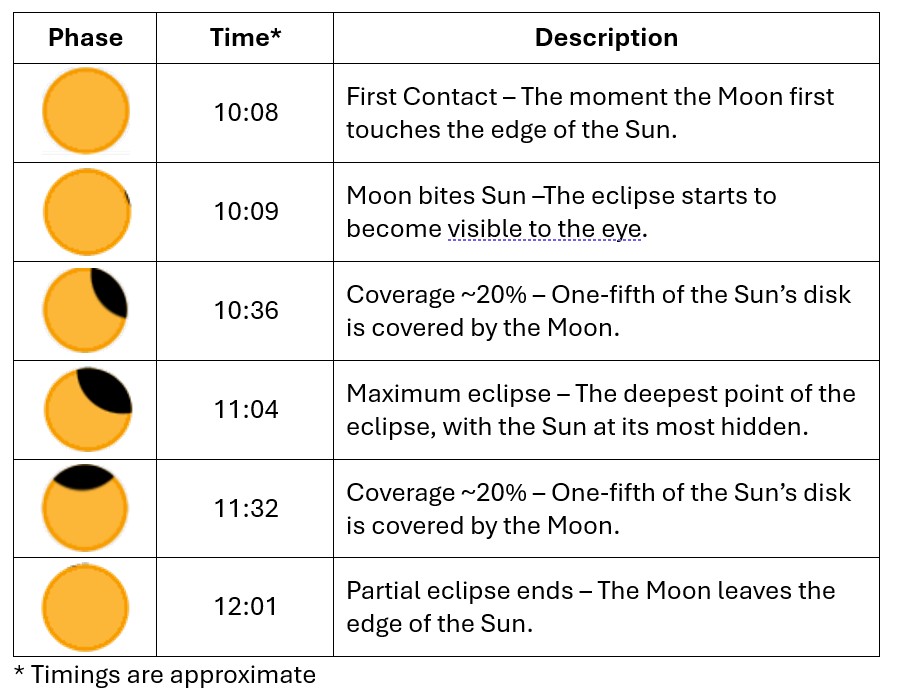
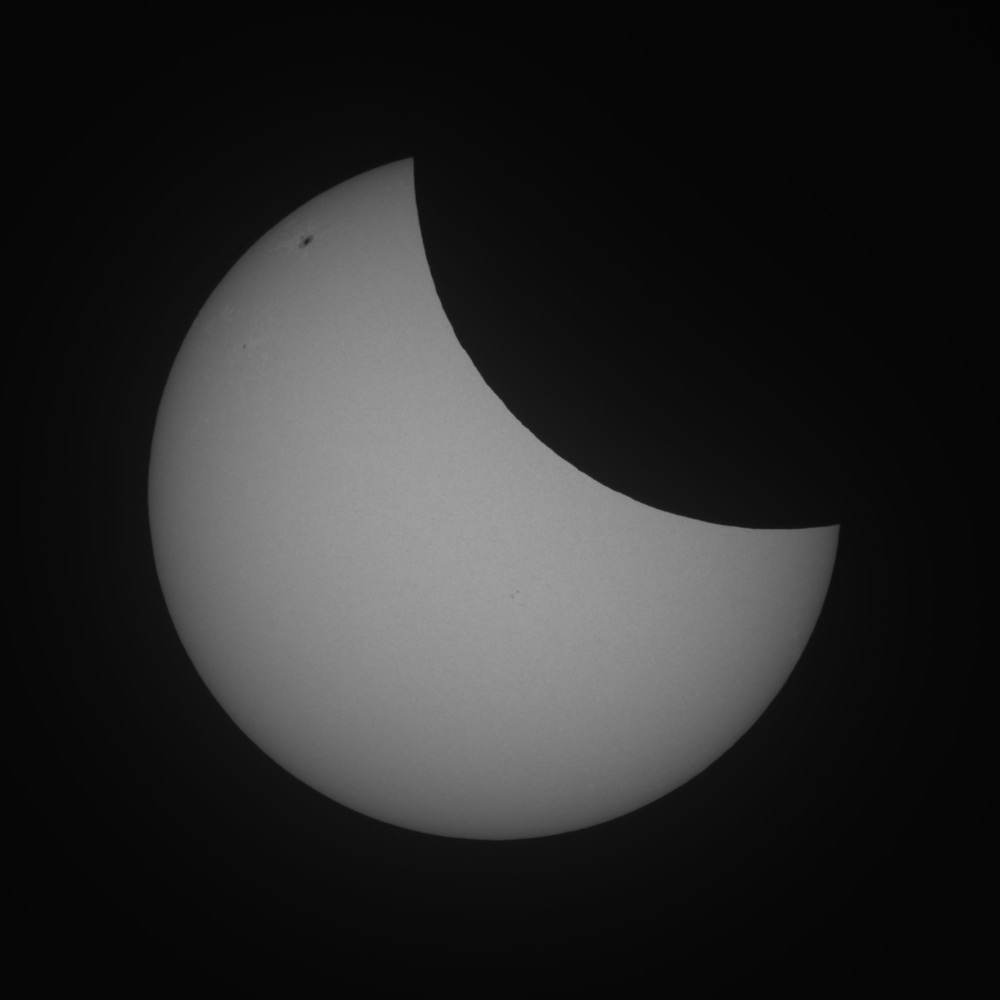
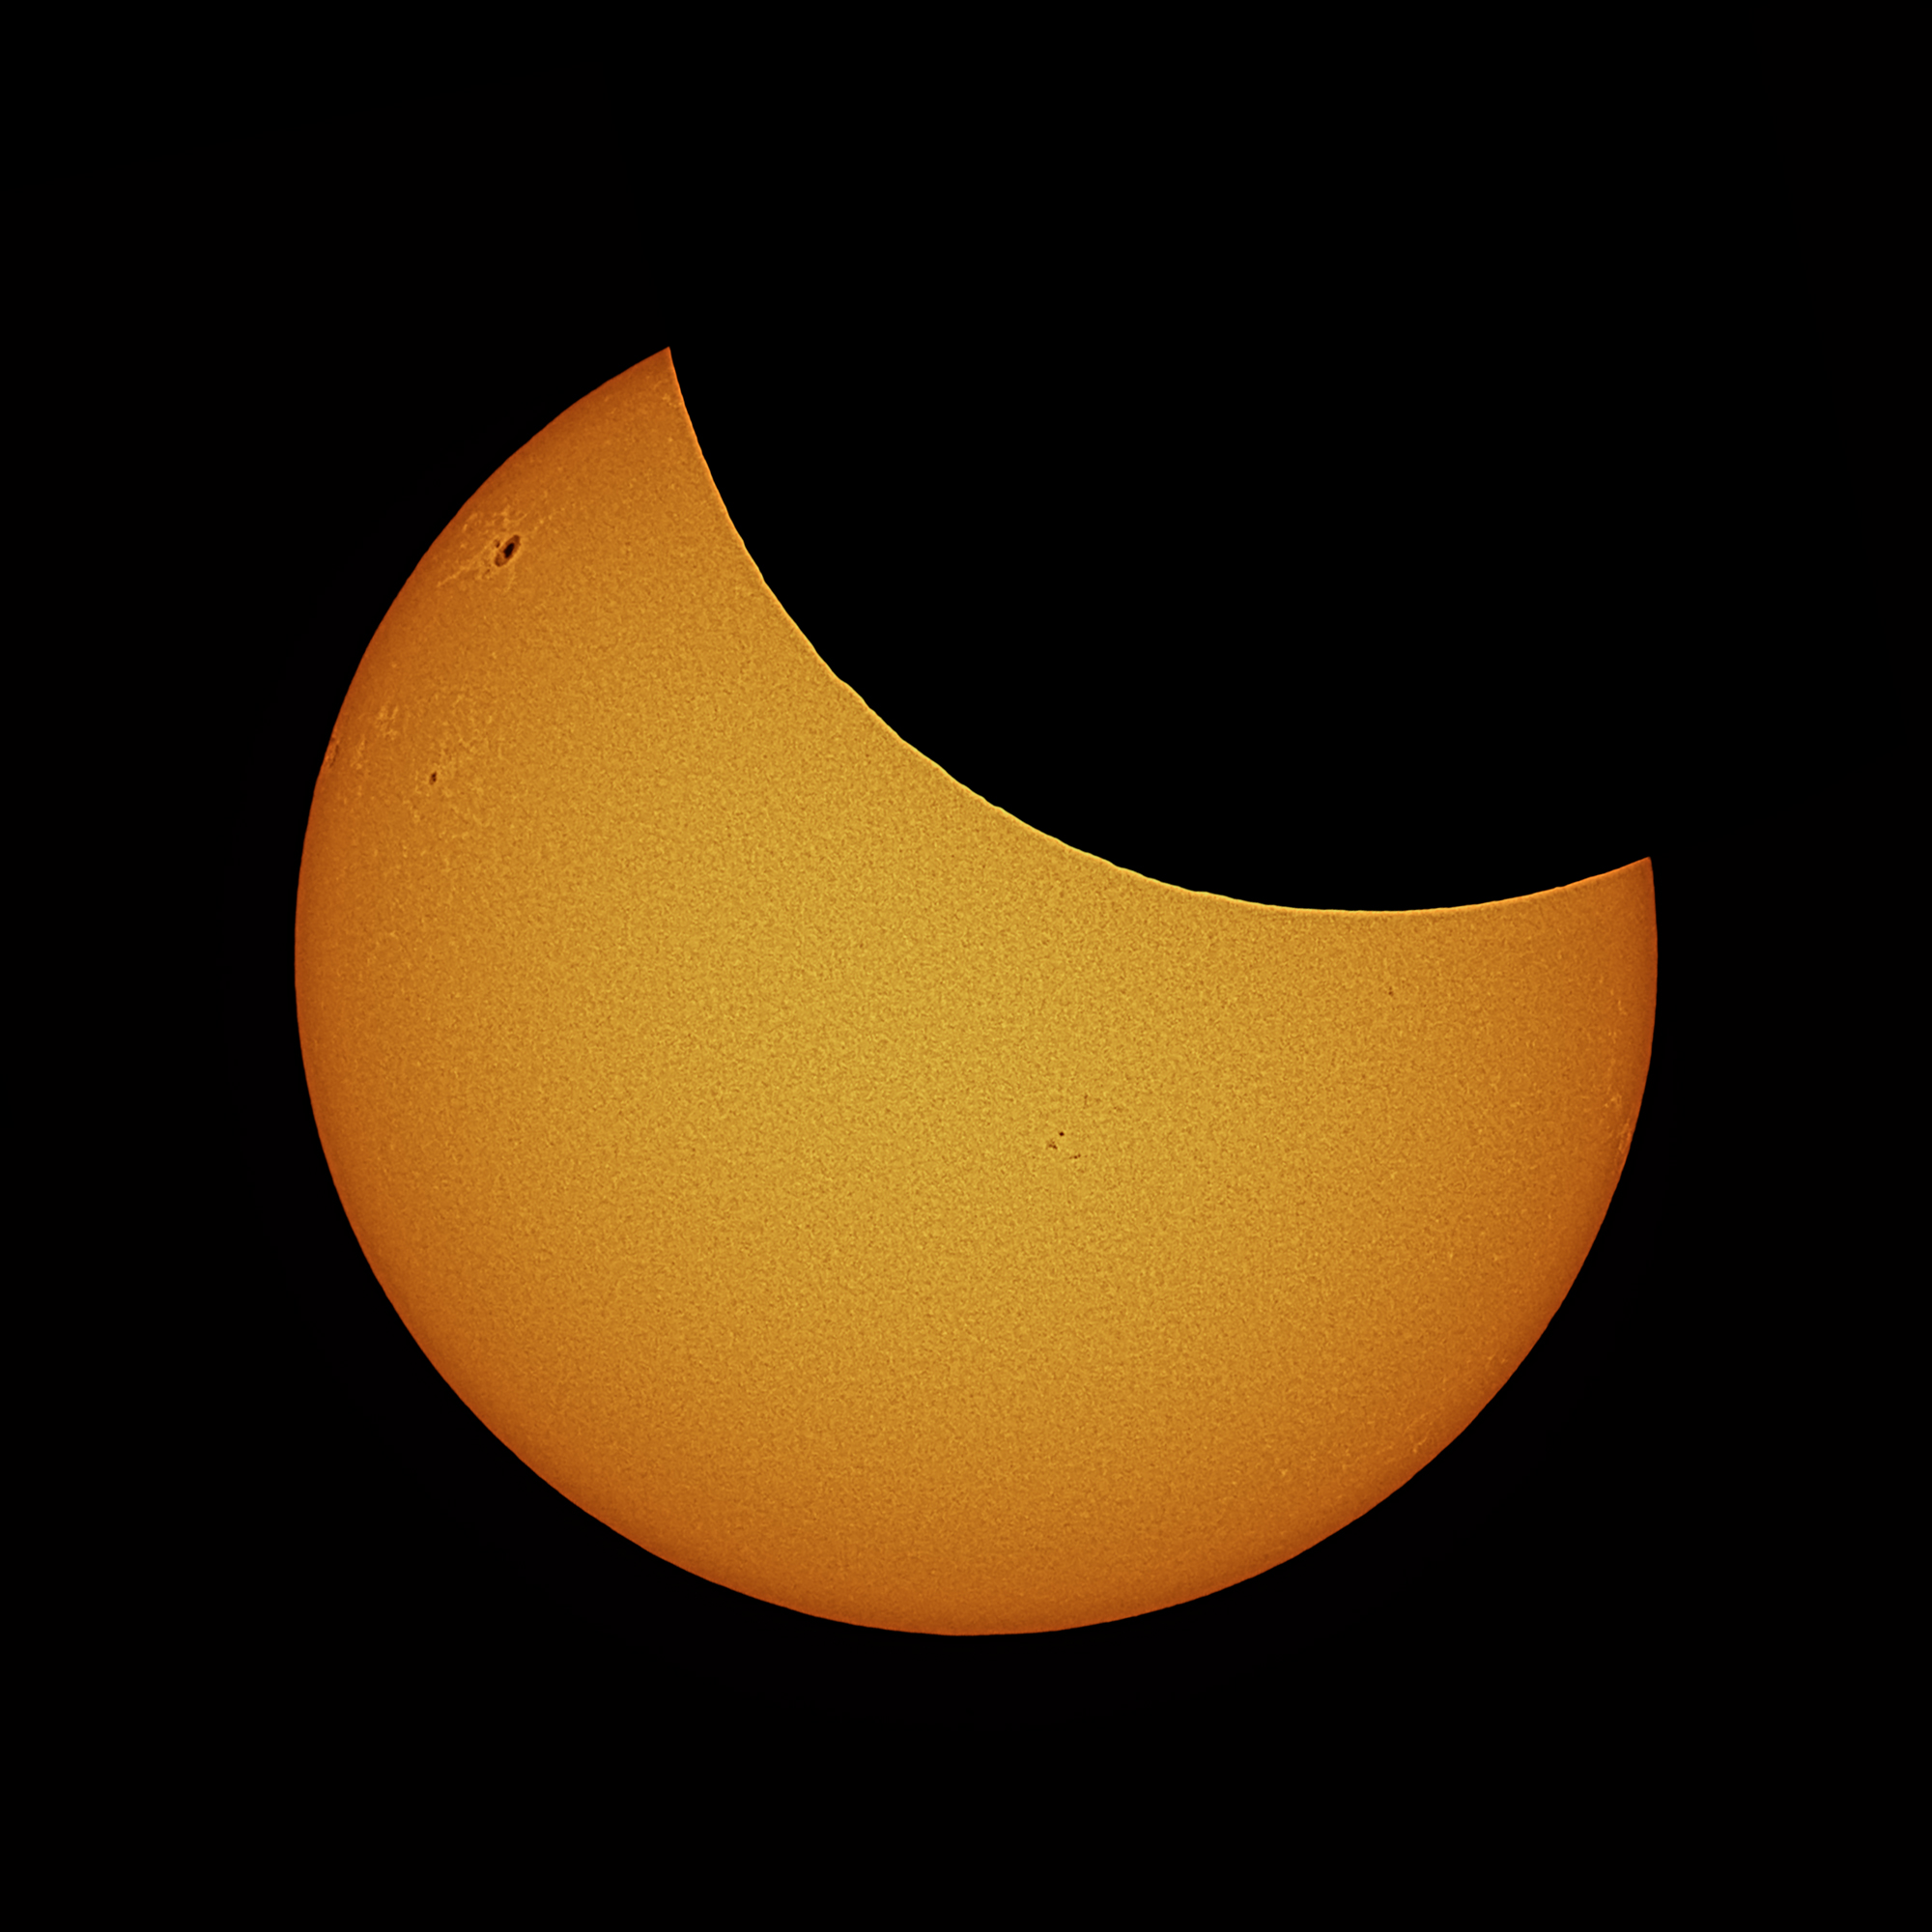
In my location in Hertfordshire, UK, just over 30% of the Sun’s surface was covered by the Moon.
Below were the approximate timings for my location: the eclipse started just after 10 am, reached a maximum just after 11 am and ended at around 12 noon.
IMPORTANT: Never view the Sun without suitable eclipse glasses or certified solar observing equipment and filters. Solar observing without proper protection can cause serious eye damage.
Solar Eclipse Photography Planning and Weather Conditions
The weather looked promising for the partial solar eclipse — a welcome surprise given the UK’s often unpredictable and overcast skies. The clear conditions the evening before were especially helpful, as they allowed me to accurately polar align my mount in advance. This saved valuable time in the morning and ensured reliable solar tracking throughout the event.
The morning began bright and clear, with blue skies at around 09:00. The eclipse was set to begin shortly after 10:00, and although the forecast hinted at some high cloud during the event, things were looking optimistic.
However, in typical UK fashion, just as I caught the first view of the Moon taking a ‘bite’ out of the Sun, the high cloud started to roll in — frustrating, to say the least.
Fortunately, as the eclipse approached its maximum, the cloud began to thin out and eventually cleared, offering some much better views. From that point on, conditions remained stable through to the end of the eclipse around midday.
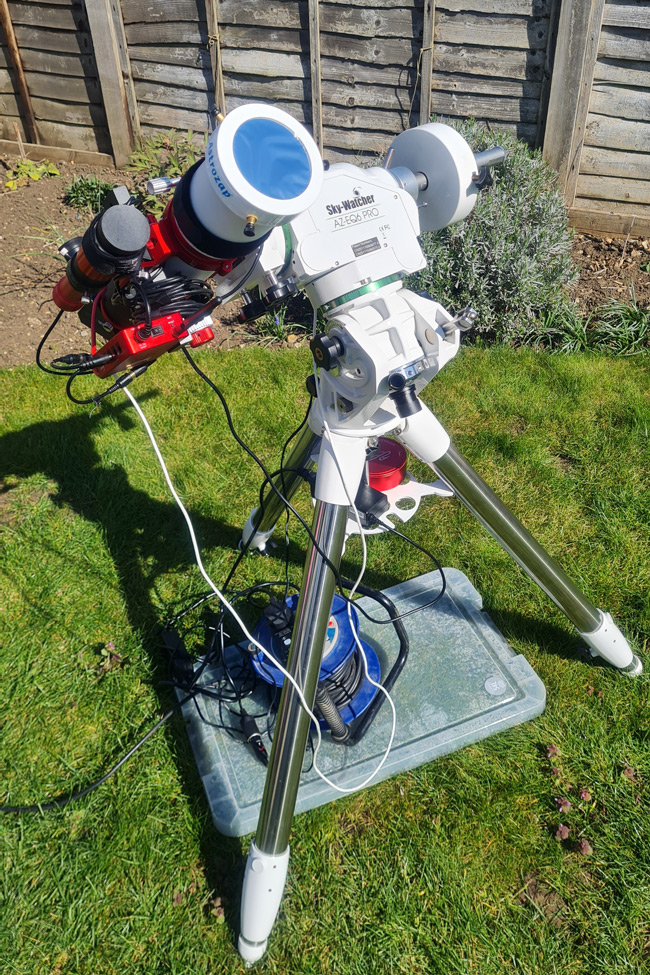
Solar imaging setup with a small refractor and a Solar film filter.
Imaging a Partial Solar Eclipse with a Refractor Telescope and Baader Continuum Filter
I used my William Optics ZenithStar 73 III, which is typically set up for Deep sky astrophotography, but I made a few changes to adapt it for solar viewing and imaging during the partial solar eclipse.
To safely observe the Sun, I fitted an Astrozaap Baader Solar film filter over the objective. This is a metal-coated film with an optical density of 5.0, meaning it reduces light transmission by 100,000 times — allowing only 0.001% of the light through. It produces a crisp, white-light image of the Sun, making sunspots stand out clearly.
For visual observation, I replaced the William Optics field flattener with a 2″ diagonal and removed the ZWO electronic focuser. This made manual focusing much easier, especially since I was frequently switching between eyepieces and a camera. With this setup, I could quickly alternate between visual viewing and imaging as needed.
When observing the Sun visually, I found that using only the AstroZaap solar film filter still resulted in an image that was a bit too bright for comfort. To address this, I added a Baader Solar Continuum Filter, which has a narrow 7.5nm FWHM bandwidth centered at 540nm.
This filter effectively acts as a monochromator, significantly narrowing the spectrum of light that reaches the eye. By doing so, it helps minimise the effects of atmospheric turbulence and enhances image contrast and sharpness. It also brings the brightness down to a more comfortable level for extended visual observation.
The only noticeable trade-off is the green tint the filter produces. However, this matches the peak sensitivity of the human eye and aligns well with the central wavelength that most optical systems are optimised for — so it’s actually a practical choice despite the colour.
The setup is also ideal for visual viewing of the partial solar eclipse (No children were blinded in the making of this image).
Unlike standard lucky imaging of the Sun or Moon, where you can capture a high frame rate video for 2–3 minutes and stack the sharpest frames, a partial solar eclipse presents a unique challenge. The Moon moves quickly across the Sun’s disc, and that motion introduces stacking artefacts if the video sequence is too long.
At my focal length of 430mm, I found I had to limit individual video captures to around 15–20 seconds to avoid noticeable motion blur or misalignment due to the motion of the Moon across the Sun’s surface.
However, with intermittent high cloud during the eclipse, I still opted to capture longer 2–3 minute videos. This allowed me to take advantage of the quality estimator in AutoStakkert, which analyses the entire video and ranks frames based on sharpness.
Typically, you’d stack a small percentage of the best frames, about 5-10% — but that approach doesn’t work well here, since the best-quality frames might not be consecutive, and the Moon’s motion makes non-sequential stacking problematic.
To work around this, I reviewed each video and selected specific 15-second segments where the average seeing and transparency were clearly better. AutoStakkert makes it easy to isolate and process just those portions, allowing for higher-quality stacks without introducing motion-related artefacts.
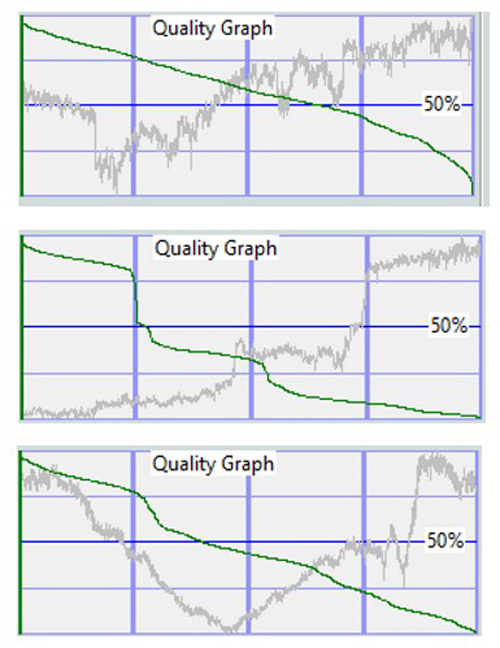
Examples of video frame quality analysis graphs produced by Autostakkert to help assess the best frames for stacking
In the video quality graphs (examples shown above), I identified the segments where the frame quality was noticeably better and used those portions for stacking. While this method is slightly more subjective than a purely quantitative approach, it worked well to mitigate the variations caused by passing high cloud.
Solar Imaging Workflow in PixInsight
After stacking the selected frames in Autostakkert, I brought the resulting image into PixInsight for further processing.
I was using the ZWO ASI585MC — a fantastic one-shot colour camera that’s particularly well-suited for solar, lunar and planetary imaging.
Using a one-shot colour camera does come with a slight resolution trade-off compared to an equivalent mono camera setup, but due to the Bayer matrix having two green pixels and using the ‘green’ Baader Solar Continuum filter, the resolution loss is less pronounced than it would be in the red or blue channels.
It does, however, give the resulting stacked and debayered image a distinct green colour.
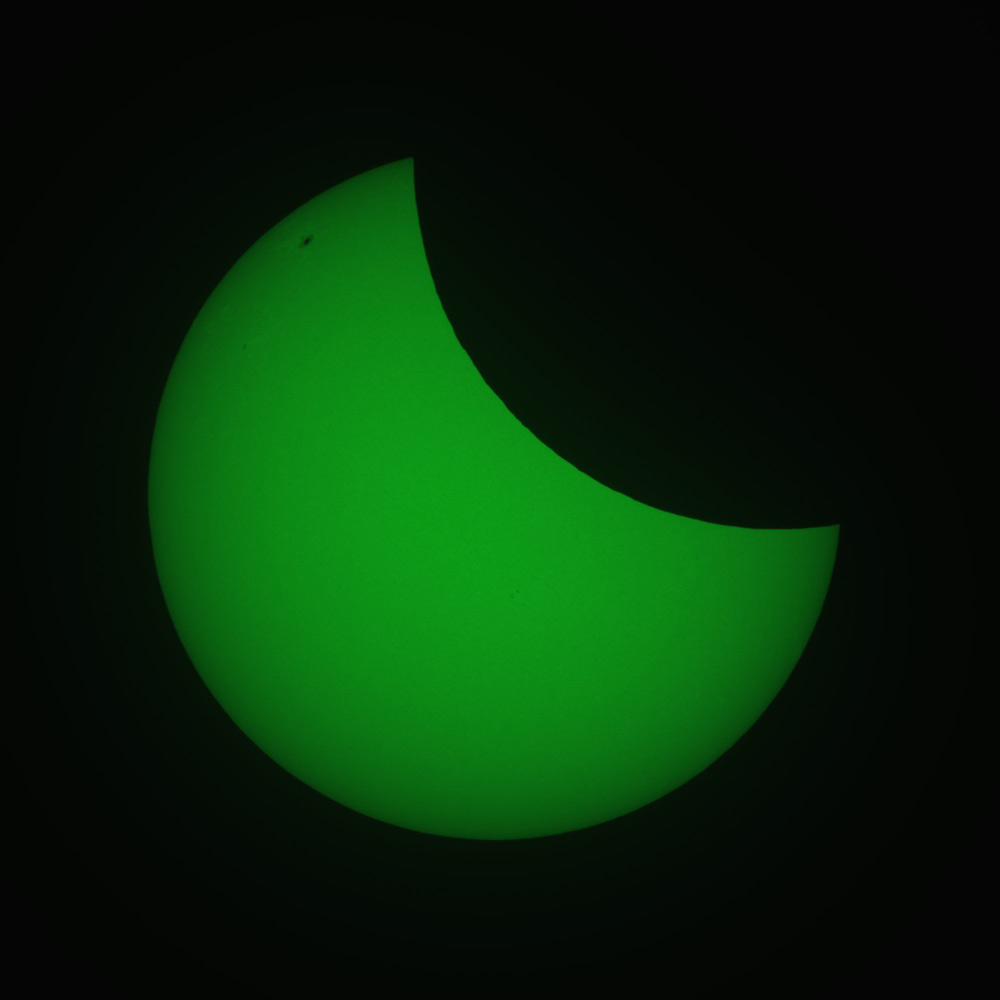
Since all the key information is contained in the green channel, I extracted this channel from the image and discarded the red and blue channels. While there was some faint signal in those channels, it wasn’t where the main solar detail was located.
Essentially, the red and blue channels were just noise compared to the green channel, so they were removed to avoid unnecessary data clutter.
The image was already well exposed (the sun is a bright target), so there wasn’t much need for additional stretching. Instead, the focus was on sharpening and enhancing contrast to bring out the finer details hidden within the unprocessed stacked image.
I started by applying a gentle Multi-Scale Linear Transform (MSLT) in Pixinsight, which helped to sharpen the image. Almost immediately, more details began to emerge, revealing finer features that weren’t initially visible.
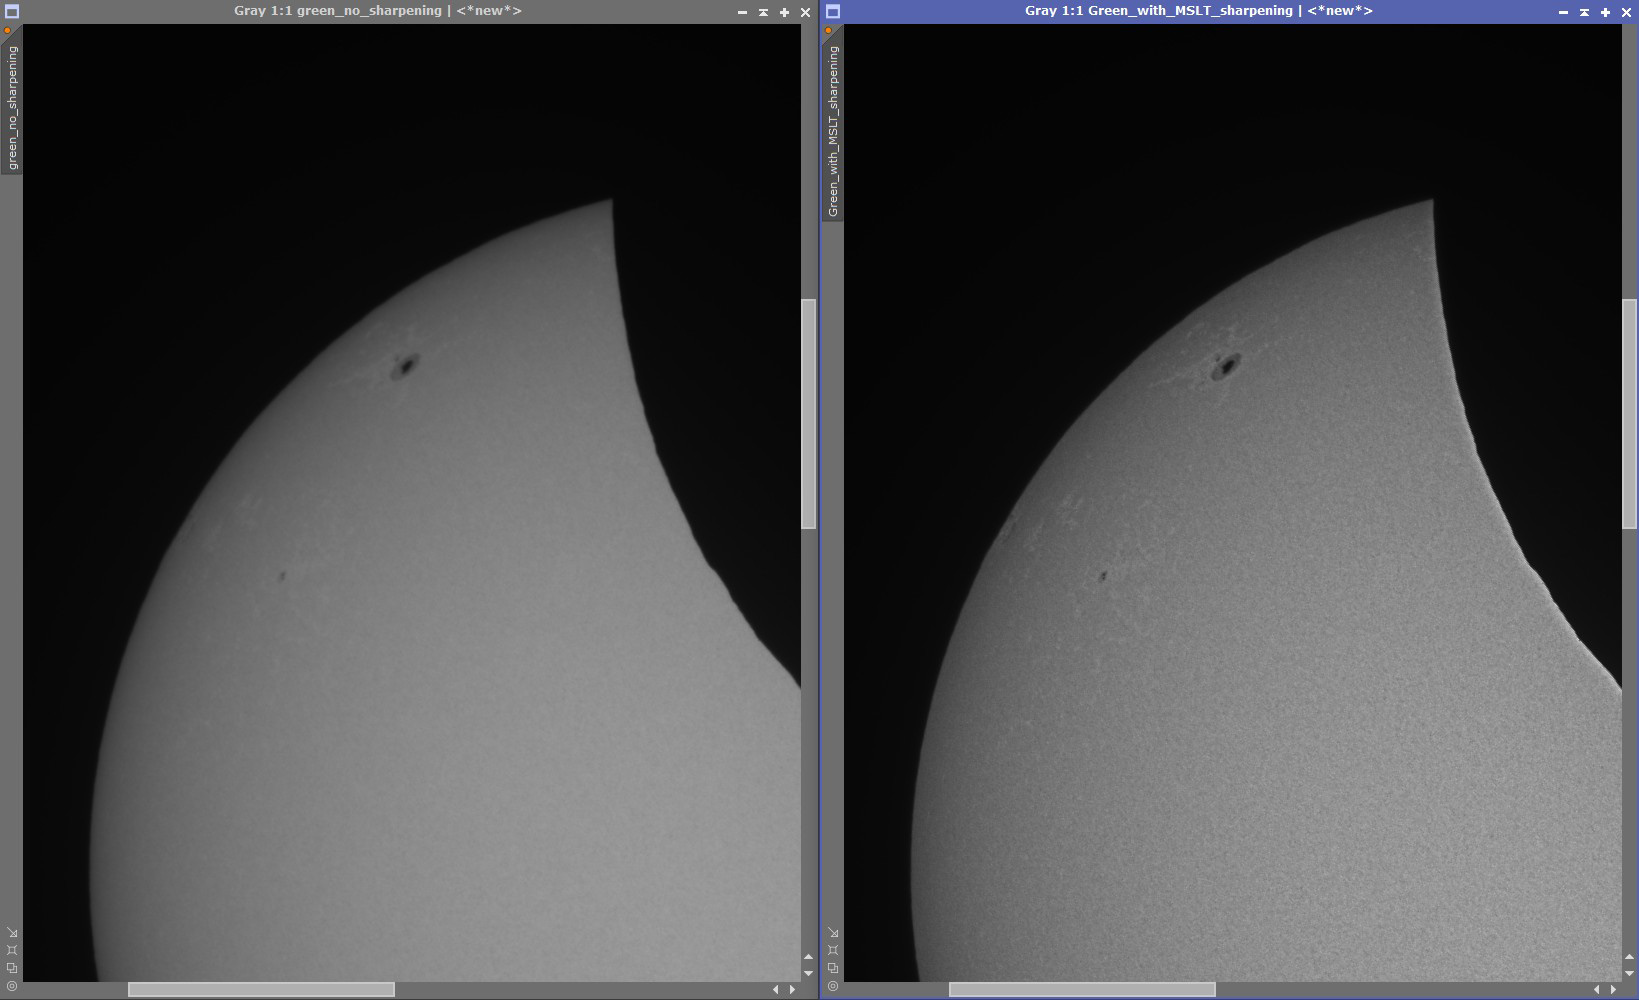
I’ve also been using the Solar Tool Box process in PixInsight, which is a very handy set of tools specifically designed to help process solar images.
Upon opening the Solar Tool Box process and enabling the colour checkbox in the preview, the default colour palette was applied to the greyscale image. The default colours were clearly well thought out, resulting in a pleasing palette I only needed to make minor adjustments to get the final colour I was happy with.
It should be noted that the Sun is actually white, not yellow or orange. The colours in my image are purely aesthetic and align with our common perception of the Sun, as this is often how we see it after the shorter wavelengths of light have been scattered by the atmosphere.
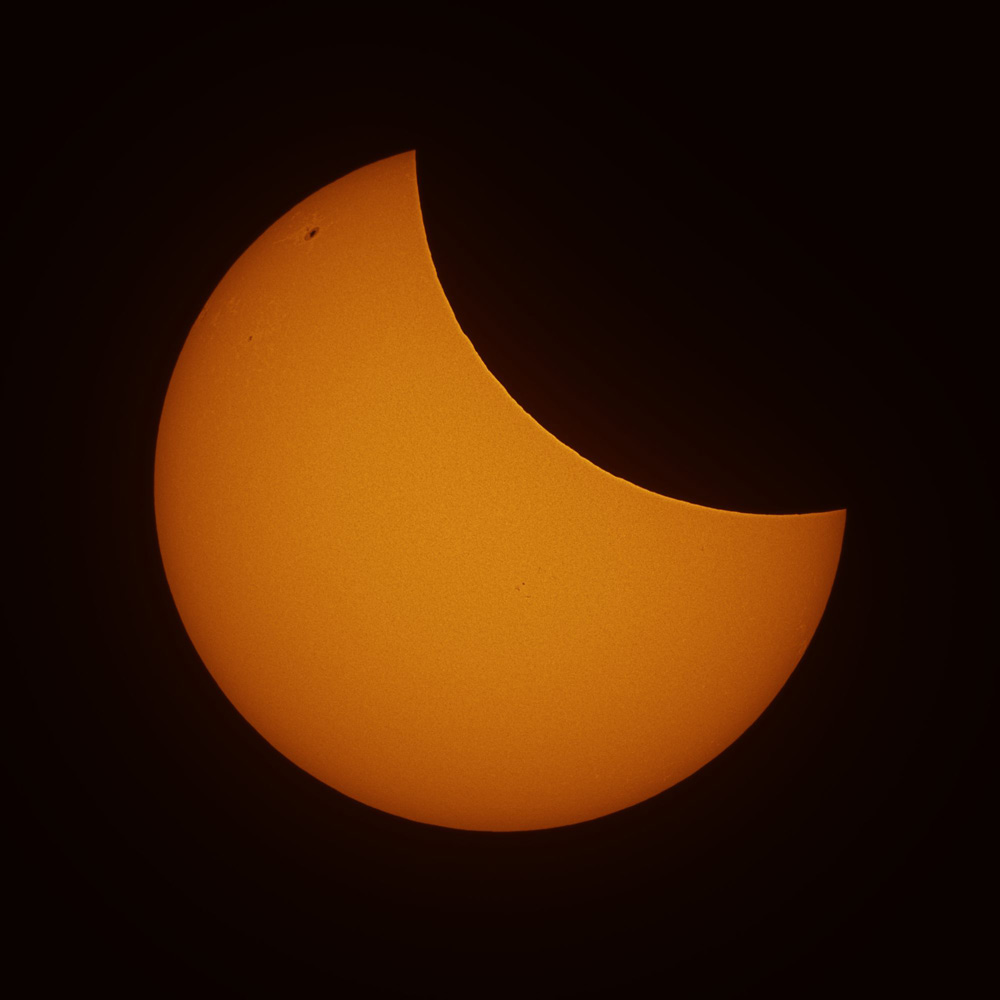
Next, I experimented with the contrast and sharpening settings. It would have been easy to overdo it at this stage, and while I could have pushed it a bit further, I stopped at a point that effectively highlighted the photosphere details and enhanced the areas around the sunspots without going too far.
While individual solar granules weren’t resolved, there was a clear indication of the photosphere structure — impressive for a modest 73mm aperture.
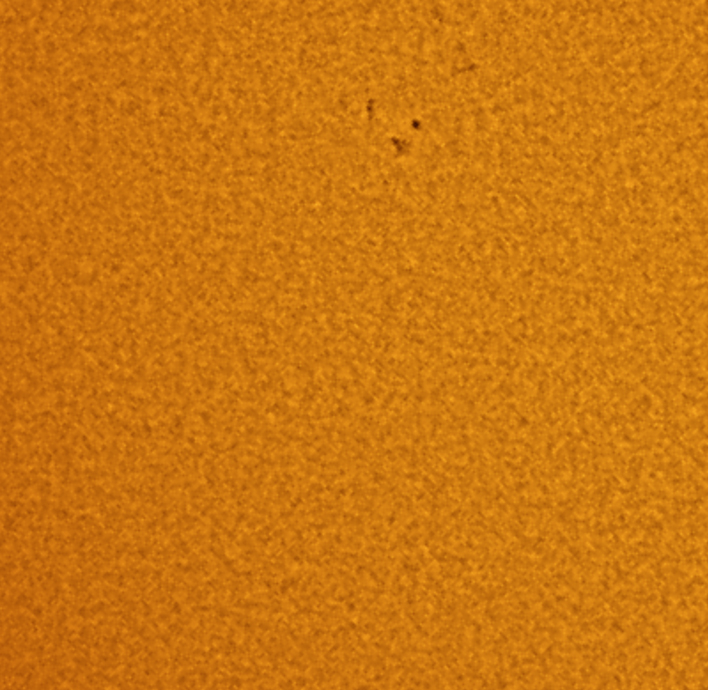
However, one downside of sharpening and deconvolution is the potential for ringing artefacts, where over-bright or over-dark contrasts appear at edges. I was able to manage the ringing around the Sun’s edge fairly well, though there’s still a slight ringing at the boundary between the Sun and Moon. Fortunately, I was able to control this enough so that it didn’t significantly impact the final image. Additionally, I preserved the Moon’s topography, capturing its bumpy edge, which is defined by mountains and craters.
To double-check that I hadn’t just sharpened noise, I revisited the unsharpened image and examined the individual extracted wavelet layers. I wanted to assess the signal-to-noise ratio (SNR) at the finer scales. I was pleased to find that even at the finest scales, there was clear detail and a strong SNR, confirming that the details were likely real photosphere features.
These features were also consistent with other examples of the Baader Continuum filter at a similar aperture that I’ve seen on Astrobin.
With that confidence, I was able to produce the following image (click for larger image).
Overall, I’m pleased with the final image of the partial solar eclipse, especially considering it was captured using a small refractor paired with a simple solar film and continuum filter setup. The level of detail I could extract with this modest gear was genuinely satisfying in less-than-ideal conditions.
That said, this experience has sparked a deeper interest in solar imaging, so a dedicated H-alpha solar scope or perhaps a Daystar Quark is starting to look like a very tempting future upgrade!
Frequently Asked Questions
🔹 What’s the best way to photograph a partial solar eclipse with a refractor telescope?
Using a small refractor like the William Optics ZenithStar 73 with a certified solar filter and a camera such as the ZWO ASI585MC is a great setup. Pair it with a solar continuum filter to enhance contrast and detail, and use a tracking mount to maintain alignment throughout the eclipse.
🔹 Can I photograph a solar eclipse without a tracking mount?
Yes, but a tracking mount helps maintain alignment, especially at higher focal lengths. With a non-tracking mount, you will need to keep moving the camera manually to keep up with the Sun’s movements.
🔹 Can you do solar imaging with a one-shot colour camera (OSC)?
Yes! While a monochrome camera offers the highest resolution, OSC cameras like the ASI585MC perform very well, especially when using narrowband filters like the Baader Solar Continuum filter.
🔹 Is the Baader Solar Continuum Filter good for beginners?
Yes, it’s one of the easiest ways to improve solar imaging for beginners. The Baader Solar Continuum Filter boosts contrast and cuts through atmospheric distortion, making it ideal for white light solar photography with small telescopes.
🔹 What is the best shutter speed for solar eclipse photography?
Shutter speed depends on your setup, but the Sun is bright, so start with a short exposure of 1/1000s and then adjust based on the result. Try to find an exposure that ensures that no highlights are clipped.
🔹 What software should I use for processing solar images?
AutoStakkert is great for video analysis and frame stacking, while PixInsight or Photoshop is ideal for sharpening, contrast enhancement, and colour correction.
🔹 How do you deal with high clouds during solar imaging?
If seeing conditions are variable due to passing high clouds, record longer video sequences and use AutoStakkert’s quality estimator to find and stack only the clearest 15–20 second segments. This approach helps reduce artefacts caused by lunar motion during a solar eclipse.
🔹 What can I expect from solar imaging with a small aperture telescope?
Even with a 73mm refractor and modest gear, you can reveal impressive photosphere structure and sunspot detail, especially with good seeing and careful image processing.
🔹 What’s the difference between H-alpha and white light solar imaging?
White light imaging (with filters like Baader Solar film or continuum filters) shows the photosphere, sunspots, and surface granulation. H-alpha imaging, using dedicated filters or scopes, reveals prominences, filaments, and dynamic chromosphere activity. Both are great, but white light is more accessible for beginners.
0 Comments