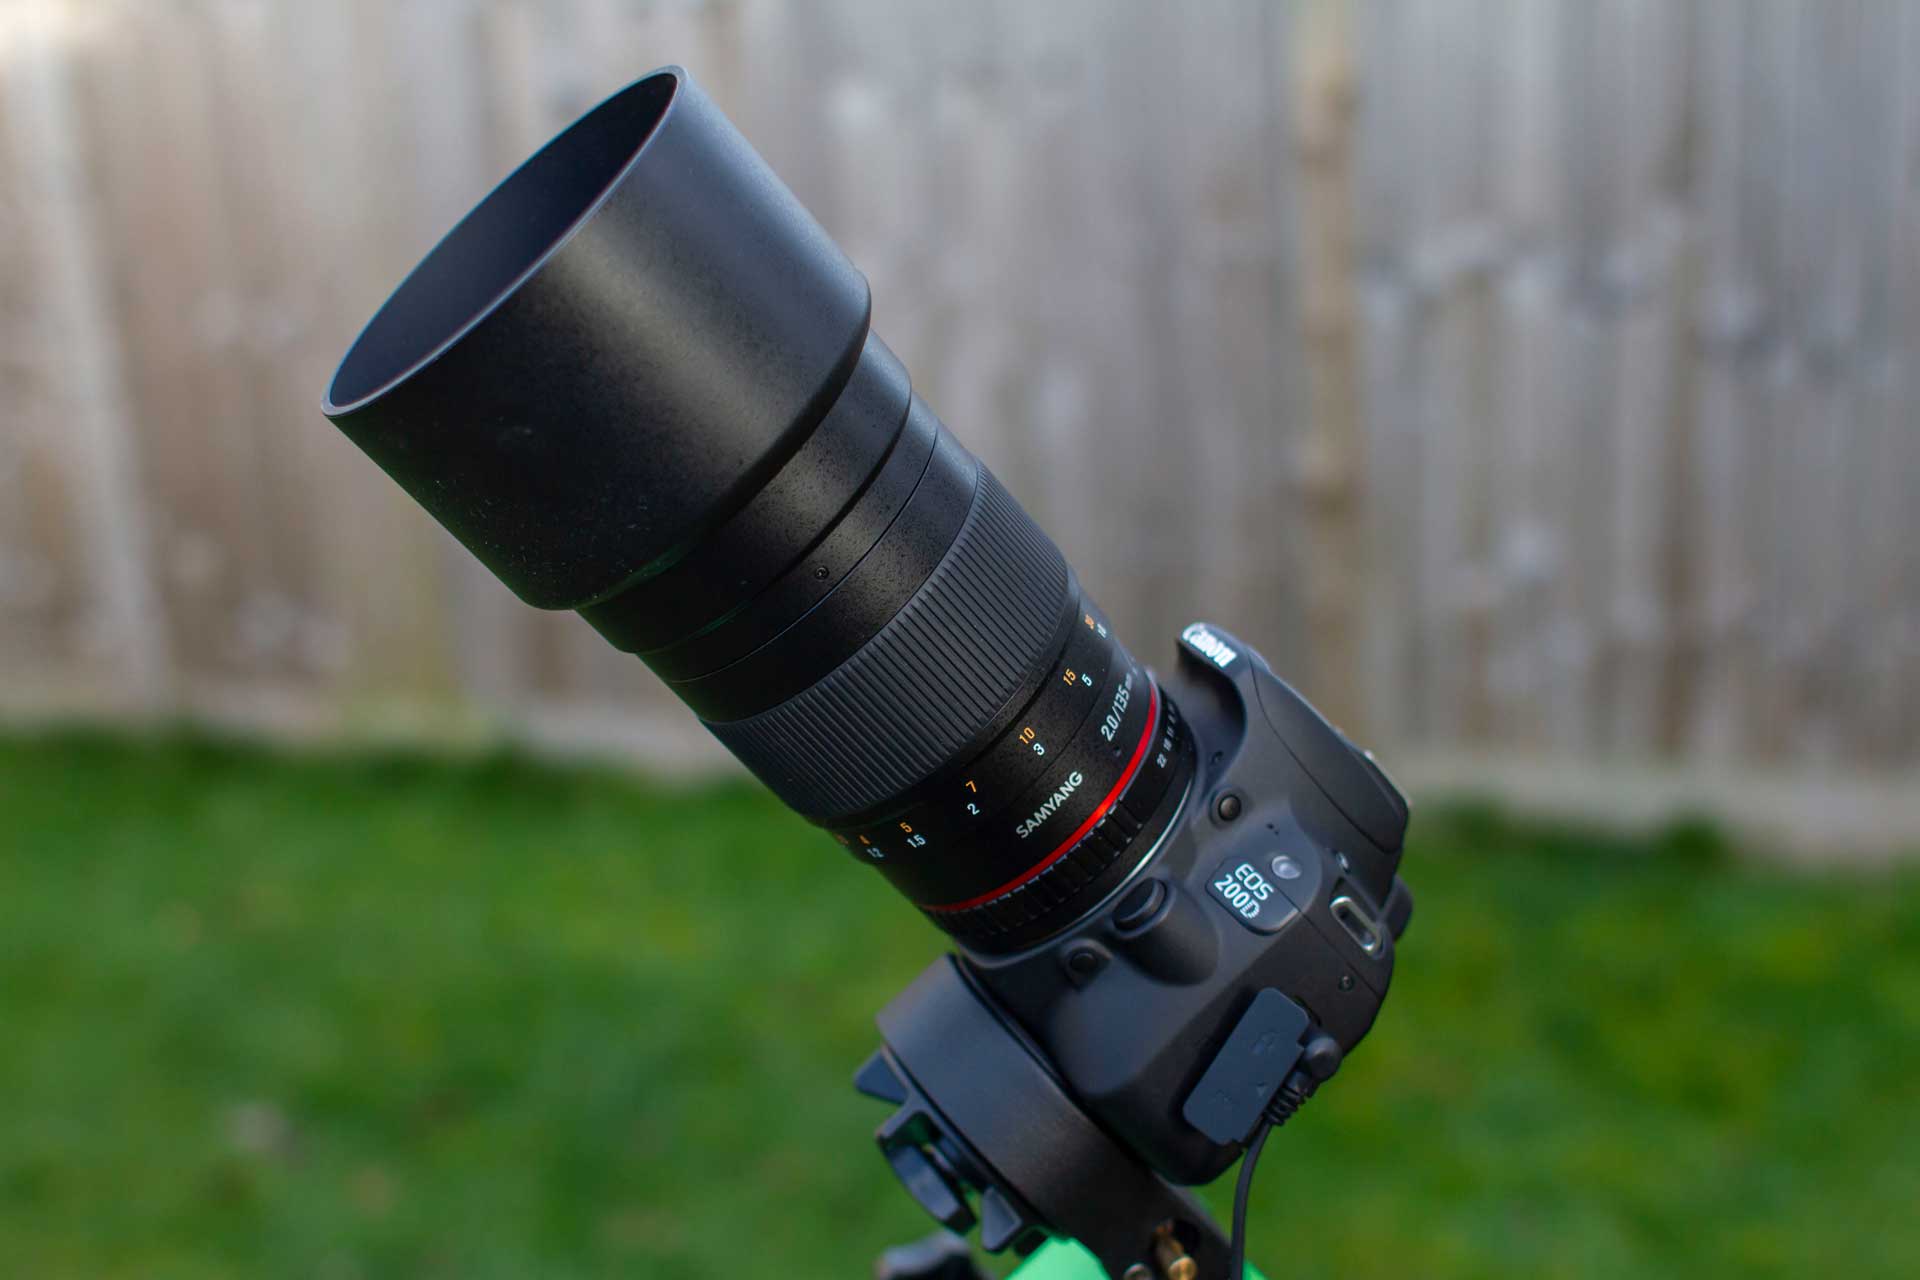
If you’re thinking about getting into astrophotography, the Samyang 135mm f/2 ED UMC prime DSLR lens should be near the top of your list — and for good reason.
The 135mm focal length, which is considered widefield in astronomy terms, will allow you to capture impressive images of larger nebulae and deep-sky objects, but short enough to work well with basic star trackers, such as the SkyWatcher Star Adventurer.
Optically, the lens is outstanding. It delivers a flat field with sharp, crisp stars right to the corners, even when paired with full-frame sensors. And thanks to its fast f/2 aperture, it gathers a lot of light. You will be able to capture fantastic astrophotography images with only a couple of hours of total exposure time.
💡 Interested in this lens? Check the latest price on Amazon (affiliate link).
Whether you’re shooting with Canon, Nikon, or a dedicated astrophotography camera via adapters, this lens performs brilliantly. (It’s also sold under the Rokinon 135mm f/2 name, but it is otherwise identical.)
Updated for 2025, this post explains why the Samyang 135mm f/2 remains one of my favourite lenses for deep-sky astrophotography. I’ll share practical tips for getting the most out of it, plus some new resources: an expanded list of target suggestions, and a dedicated Sample Images Gallery Page featuring deep-sky image examples that I have captured with this lens.
Key Features for Astrophotography
The Samyang 135mm f/2 — also sold as the Rokinon 135mm f/2 — is a fully manual prime lens, making it exceptionally well-suited for astrophotography. Don’t be put off by the lack of autofocus or the manual aperture ring; for deep-sky imaging, these are features you don’t really need.
This lens is optically designed with 11 elements, engineered to deliver a sharp, flat field with minimal distortion — exactly what you want when capturing pinpoint stars across a wide imaging frame. Below is the optical arrangement of the lens elements.
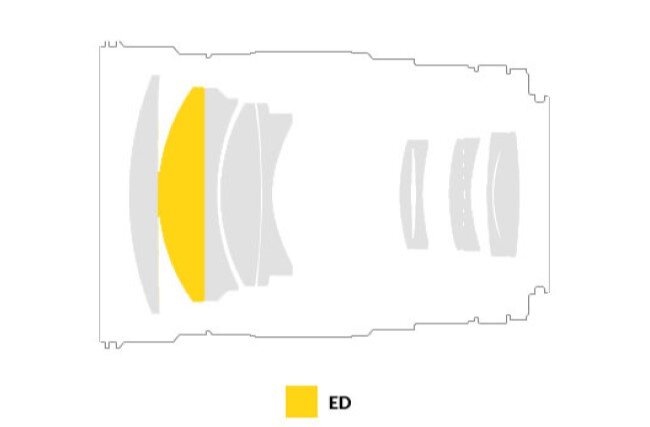
Among those elements is one made of Extra-low Dispersion (ED) glass. This ED element ensures that light at both the red and blue ends of the spectrum comes into focus together, minimising chromatic aberration, and keeping the stars in your images free from distracting colour fringing.
Each lens element is also treated with Samyang’s Ultra Multi-Coating (UMC) — an anti-reflection coating applied to both sides of each element. This coating helps reduce internal reflections, improving contrast and preventing halos or ghosting around stars.
With a clear aperture of 67mm, this lens rivals a small refracting telescope in light-gathering power and resolution. It also features a standard 77mm front filter thread, should you wish to use traditional photography filters.
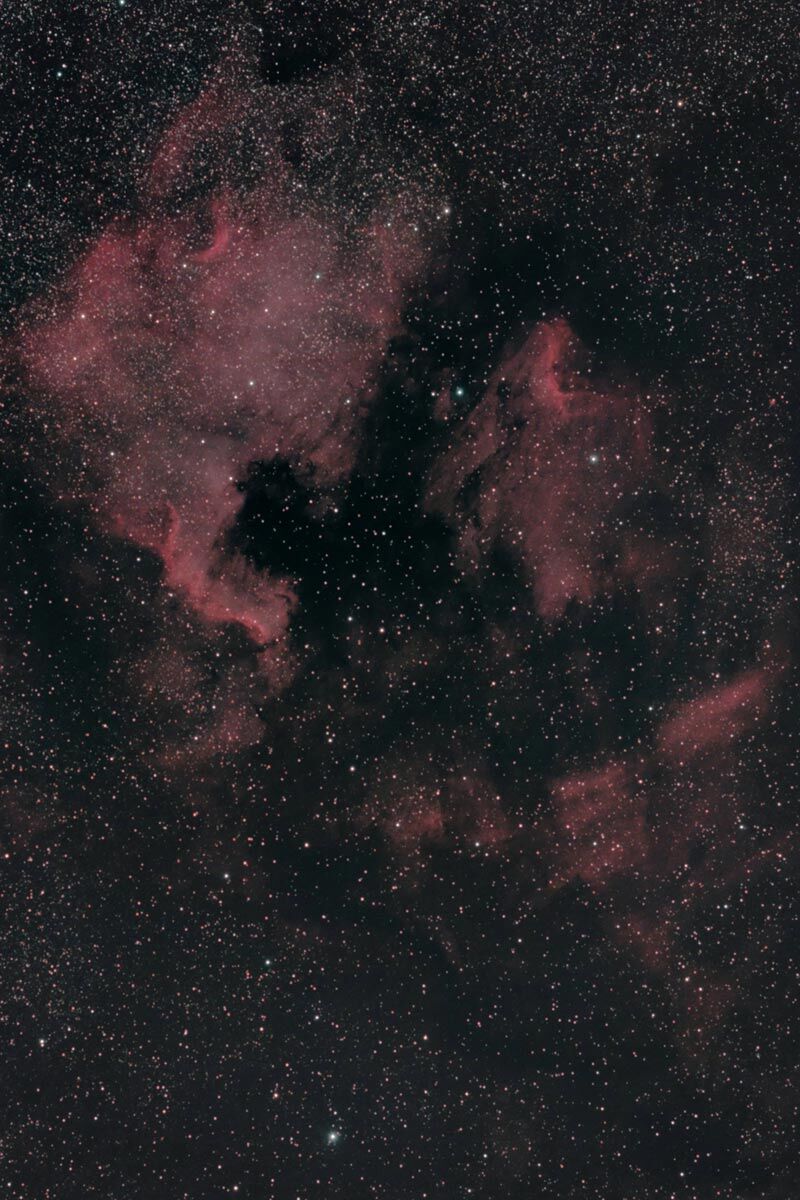
North America and Pelican Nebula in Cygnus taken with the Samyang 135mm F/2 lens, by Mike Soulby © stellardiscovery.com
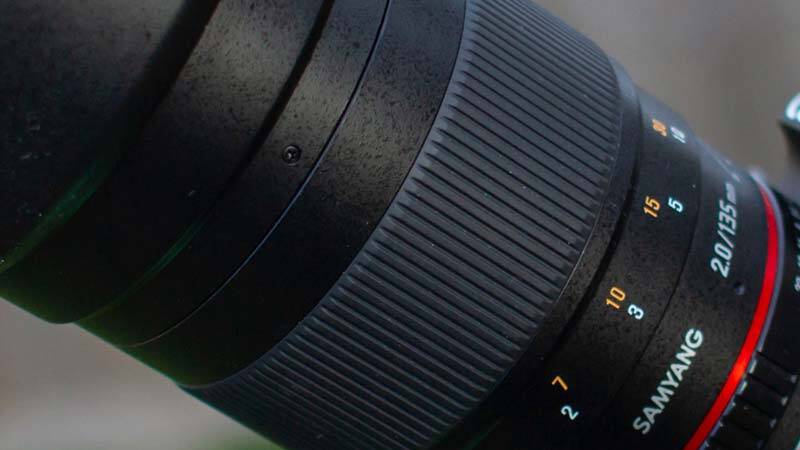
The outer diameter of the lens is 82mm and comes with a cylindrical lens hood, which slots cleanly onto the end. With the lens hood fitted, the outer diameter increases to 93mm.
The lens hood does a good job at reducing stray light, helping to maintain contrast in your images, but it also acts as an effective dew shield, allowing you to image for longer if the temperature drops below the dew point.
Build Quality & Handling
My first impressions of the Samyang 135mm f/2 were very positive — this is a solid, well-built lens. It’s on the heavier side at around 830g, largely due to the 11 internal lens elements. The lens arrived well-packaged and includes a cylindrical lens hood and a soft carry bag.
The construction is a mix of metal and high-quality textured plastic, and the materials feel reassuringly premium. Even after a thorough hands-on inspection, there were no noticeable rattles, looseness, or cosmetic flaws — everything feels well put together.
The focus ring is nice and wide, which I find is essential for a manual focus lens. It is easy to find and grip when you are trying to focus in the dark. The focus ring has a soft textured grip, and the motion is smooth, offering a good amount of resistance, making fine focusing easy.
Once in focus, there is no unwanted play or drift in the final position, so your stars remain sharp and in focus.
The large focusing ring on the Samyang 135mm F/2 lens makes focusing in the dark effortless.
Aperture adjustment on the Samyang 135mm f/2 is also fully manual, which is perfectly fine for deep-sky work, where you typically shoot the entire session at a single f-stop. You might choose to stop down slightly to f/2.8 or f/4 after achieving focus, but I’ll touch more on that later.
The aperture ring is located close to the camera mount, which can make it feel a bit cramped when adjusting, especially on bulkier DSLR bodies. That said, the click-stops from f/2 through f/22 are firm and distinct, reducing the chance of accidental changes mid-session.
One thing I find fiddly is putting the lens cap back on to shoot dark frames, especially with the lens hood fitted, or if my hands are cold. It can often take several attempts to attach it properly, so something to watch out for.
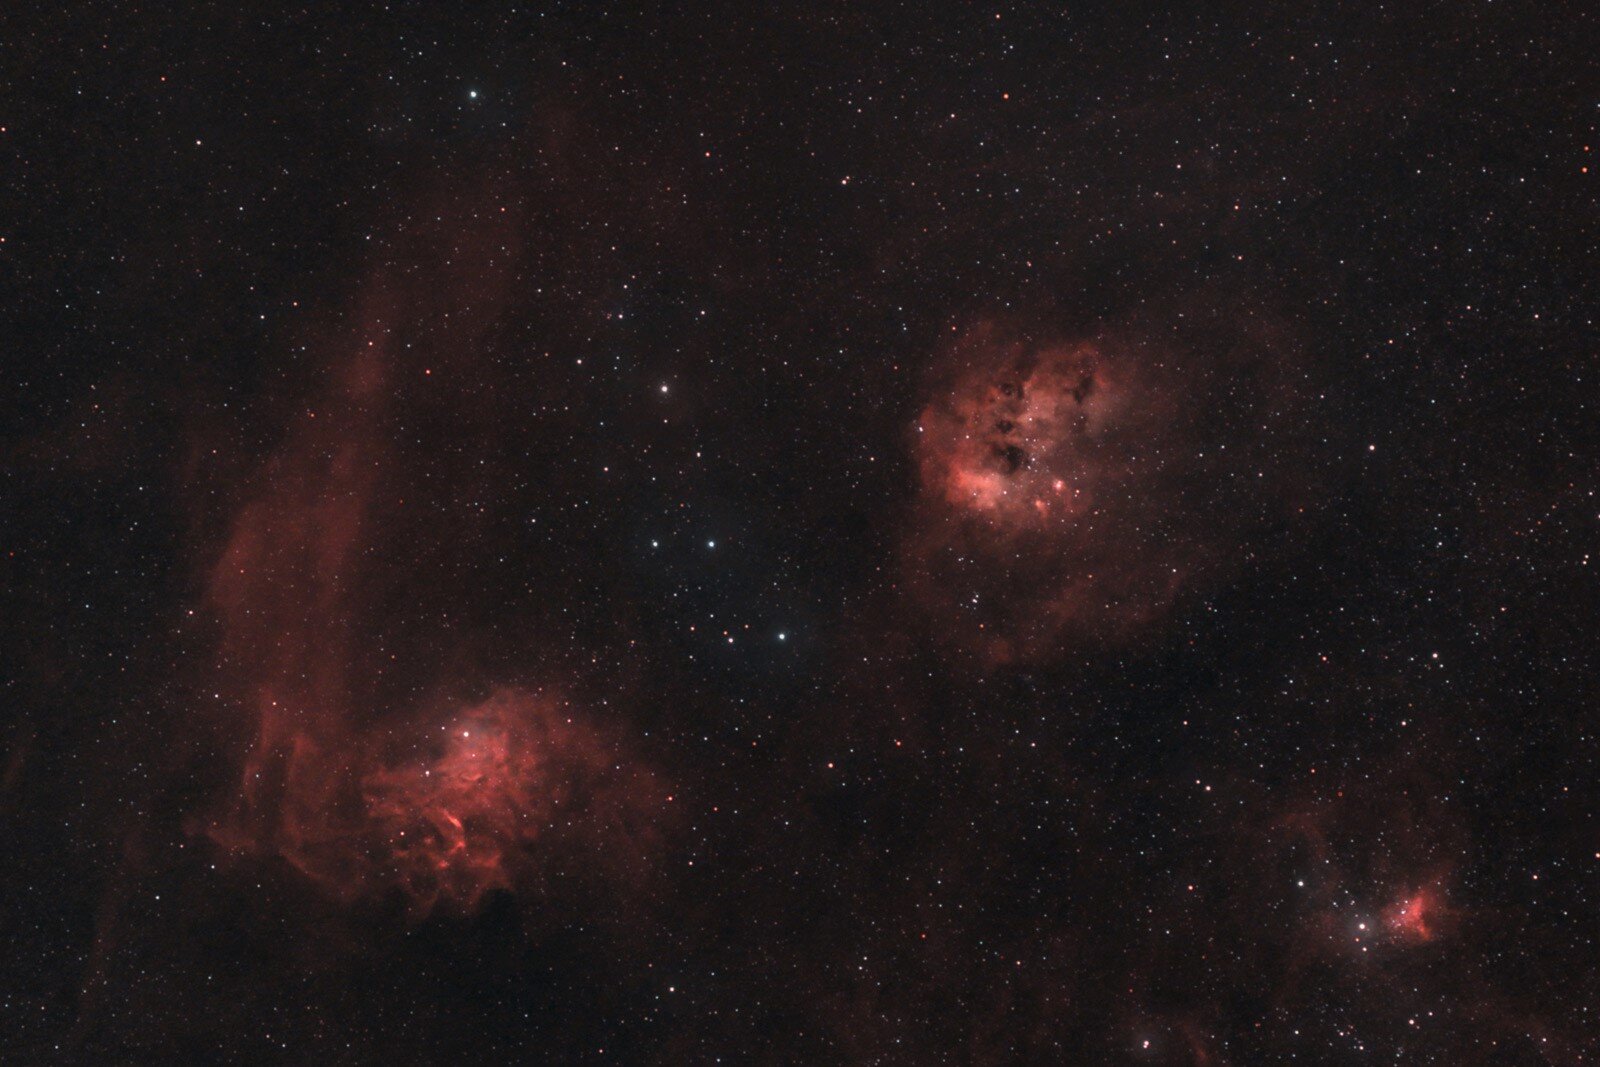
Flaming Star Nebula (IC405) and Tadpole Nebula (IC410) in Auriga is another great target for the Samyang 135mm f/2 lens, by Mike Soulby © stellardiscovery.com
Widefield Imaging with a 135mm Lens
In astrophotography terms, the Samyang 135mm f/2 is considered a very wide-field lens. Most small refractors — often regarded as widefield telescopes — start around 300–400mm focal length. So at 135mm, you’re working with a dramatically larger field of view (FoV), perfect for capturing extended deep-sky objects and star fields.
When paired with a full-frame DSLR, the lens delivers a 15.5° × 10.6° FoV (or 18.8° diagonal). On an APS-C sensor — common in entry-level DSLRs — the field still spans a generous 10.4° × 6.9° (12.4° diagonal).
To give you an idea of what this looks like, see the Stellarium simulation of Orion below for both sensor formats:
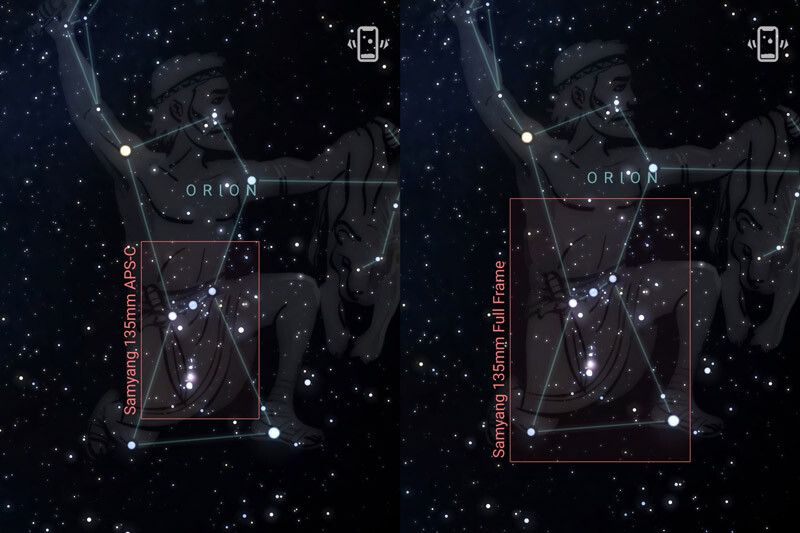
Field of view simulation in Stellarium is a great way to frame up your target in advance.
With this lens, you can capture a wide swath of the Orion constellation in a single frame:
- Orion’s Belt
- Horsehead Nebula
- Flame Nebula
- M78 (Reflection Nebula)
- M42 (Orion Nebula)
- On a full-frame sensor, even the Witch’s Head Nebula can squeeze into the frame
Using software like Stellarium to simulate your field of view in advance is a highly recommended planning step. It helps you pre-frame your targets and ensures your imaging session under clear skies is focused and efficient.
The wide FoV gives you creative freedom in both composition and target selection. Below is the image I shot of the same area in the Orion constellation using a DSLR with an APS-C-sized sensor. This has been cropped to help show off the Horsehead and Flame Nebulae, and the Great Orion Nebula together.
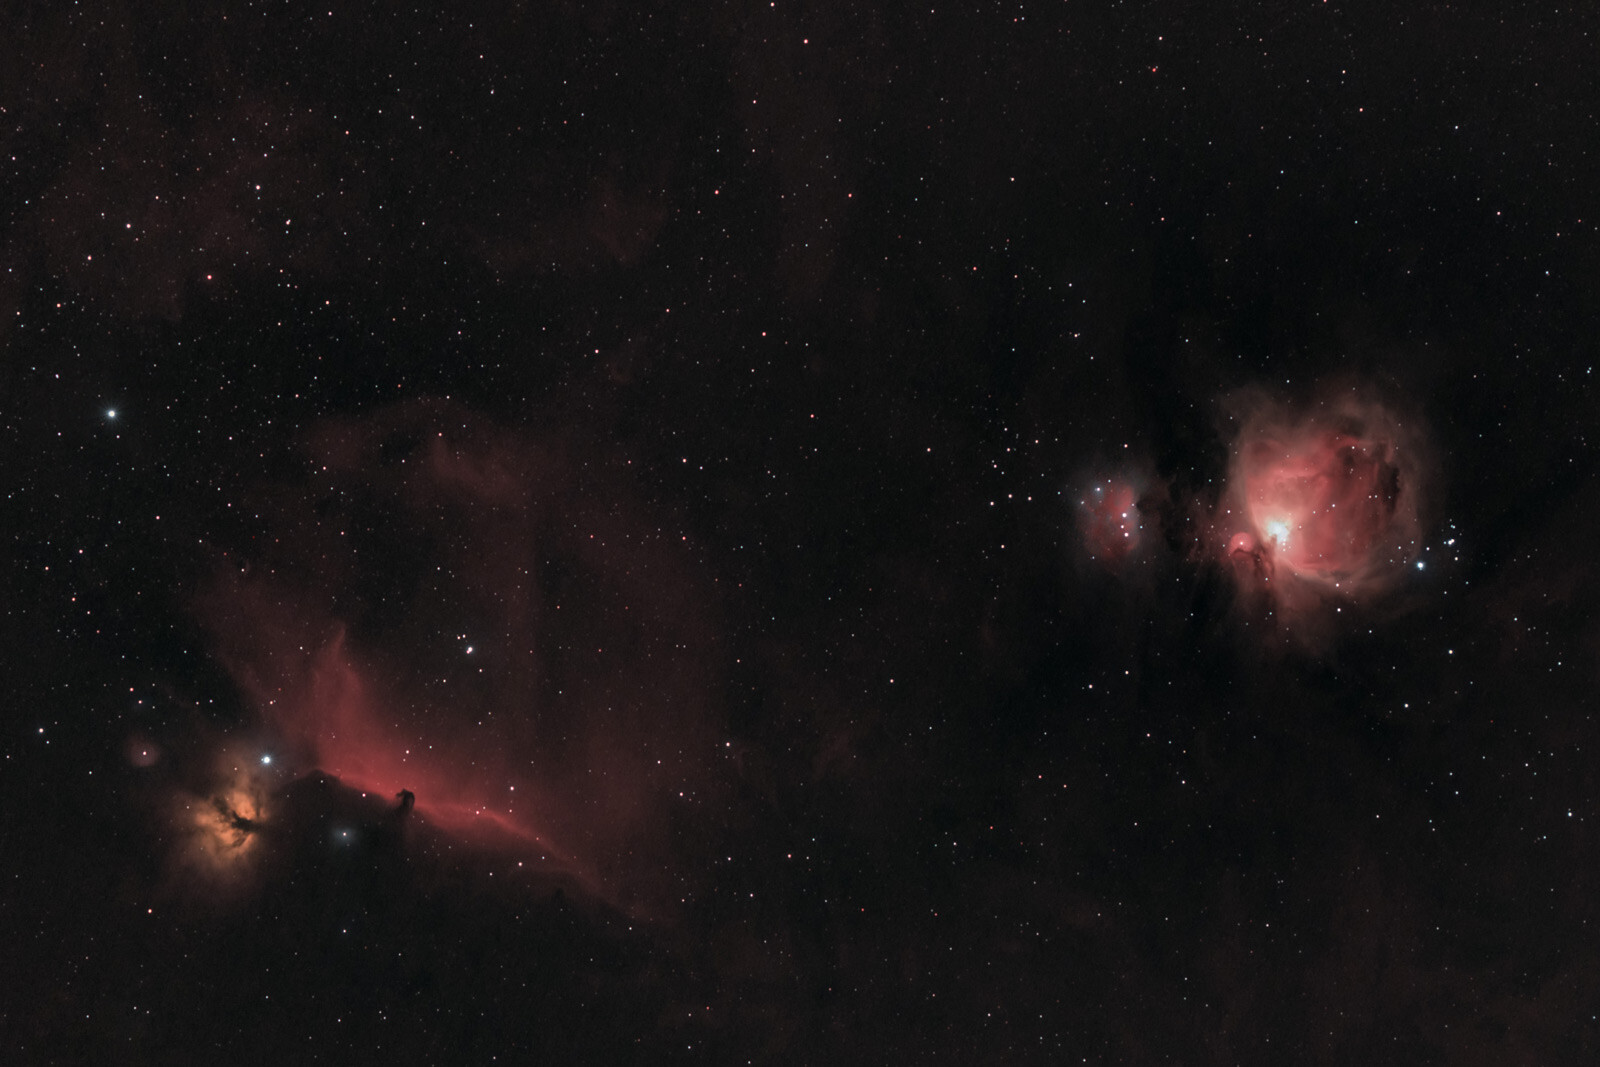
A widefield image of Orion’s Belt and Sword was taken using the Samyang 135mm f/2 lens, by Mike Soulby © stellardiscovery.com
It is possible to capture an impressive amount of detail with this lens; below is a zoomed-in version of the above image, allowing you to see the detail of the dark horse’s head and the darker areas within the Flame Nebula more clearly.
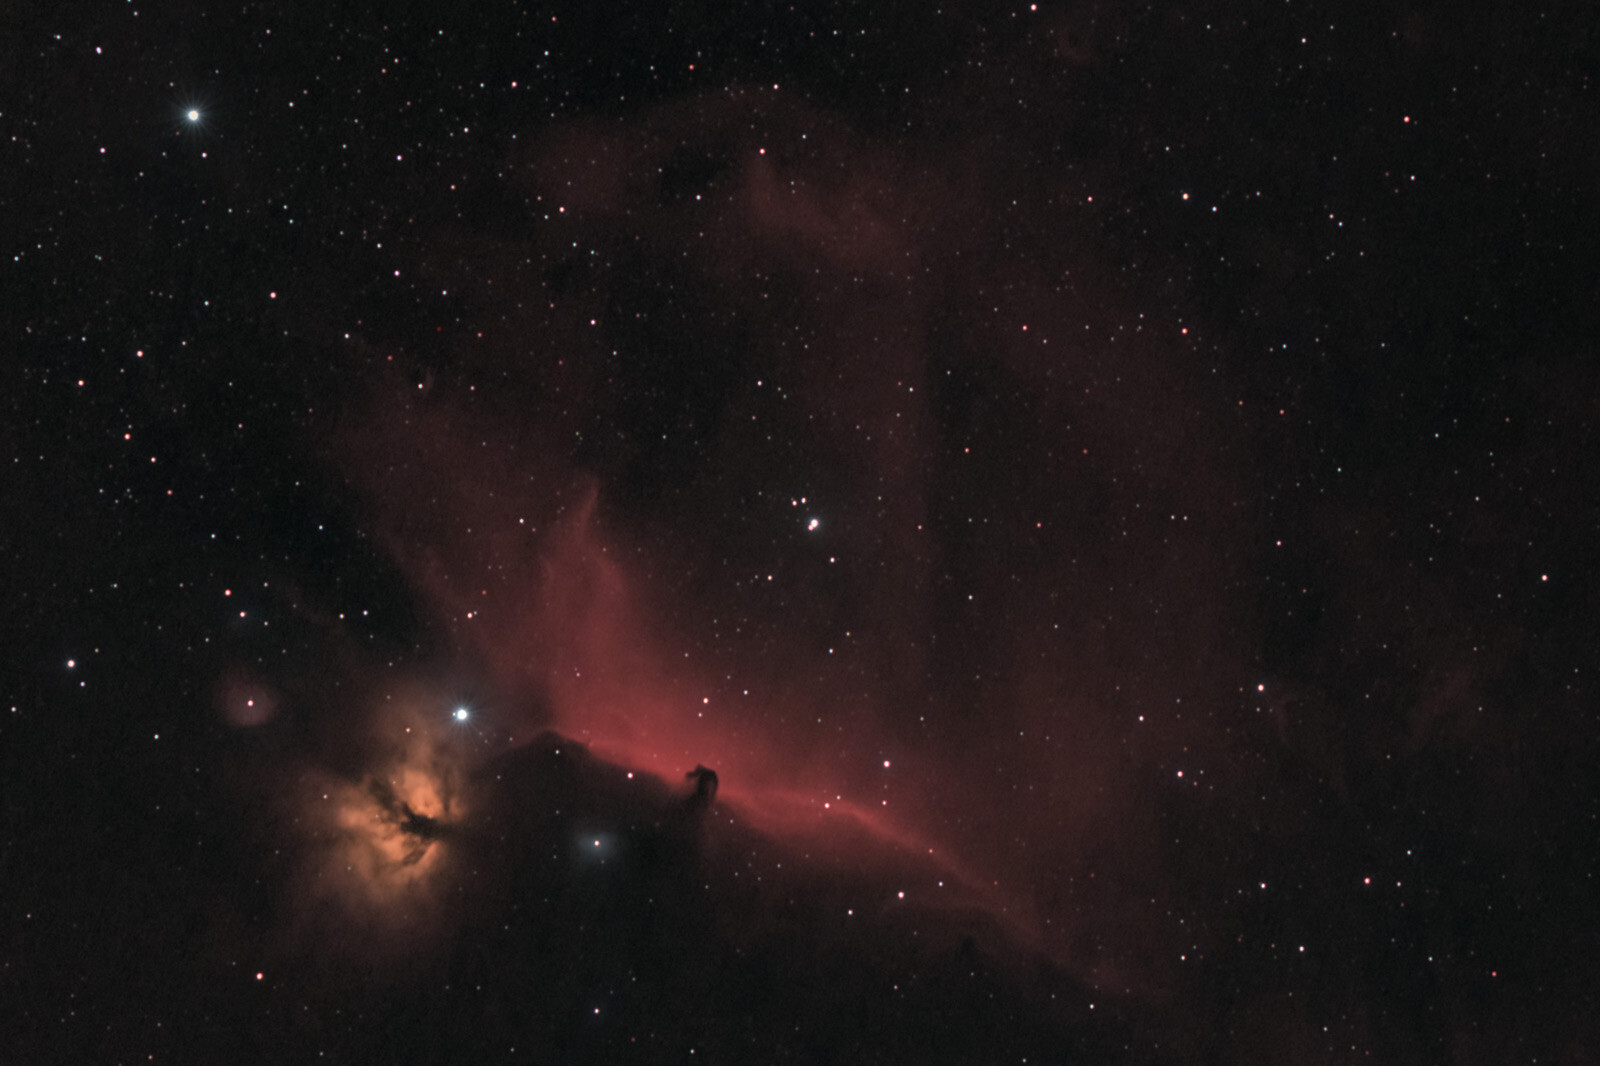
Cropped images contain impressive details, such as this crop of the Horsehead and Flame Nebula, by Mike Soulby © stellardiscovery.com
This is just one example of what this lens is great at, capturing impressive detail of large deep-sky objects and the surrounding star fields.
Focusing for Sharp Stars
Achieving pinpoint star focus with the Samyang 135mm f/2 is simple, and one of the key reasons this lens is so popular among astrophotographers.
One of the easiest and most effective focusing methods is using your camera’s Live View feature. It doesn’t require a laptop, external software, or even a Bahtinov mask — just the camera, lens, and your eyes.

The magnificent Andromeda Galaxy (M31) is a great first target for the Samyang lens, by Mike Soulby © stellardiscovery.com
Step-by-Step: Manual Focus with Live View
1) Start by setting the focus ring to infinity and the aperture to f/2. This puts you close to the ideal focus zone for stars.
2) Centre a Bright Star – point your mount at a bright star and centre it in the frame using the Live View screen.
3) Use your camera’s digital zoom feature (x5 or x10) to enlarge the star. You may need to recenter the star after zooming in using the camera’s arrow keys. You can now start to refine the focus.
4) Slowly turn the focus ring back and forth, aiming to make the star as small and sharp as possible. See the image sequence below for an illustration.
As you approach focus, you will see fainter stars appear; this is a good indication that you are on the right track.

5) Once you’ve achieved focus, consider stopping down to f/2.8 or f/4. This will increase the depth of the field, reducing the chance of focus drift with temperature, ensuring you stay in focus through the night.
I find this focusing method a very quick and reliable way to focus the Samyang 135mm f/2 without needing any extra kit or a connection to a laptop. All of the images I have shared in this post were focused using this simple method.
Learn more about focusing for sharp stars in my post on focusing for astrophotography.
Alternative Focusing Methods
While Live View is effective, there are other ways to get sharp stars:
Bahtinov Mask: This simple tool creates diffraction spikes around bright stars, helping you identify perfect focus when the central spike aligns. Learn more about Bahtinov Masks in my focusing post.
Focusing via Software: Tools like Astro Photography Tool (APT), NINA, or ASIAIR provide real-time star measurements, giving you numerical feedback of a star’s width to fine-tune focus.
Electronic Focuser: Probably the most reliable way to focus in astrophotography. An autofocuser like the ZWO EAF can be mounted to the Samyang lens using dedicated mounts and brackets. It can automatically search for the minimum star size and refocus automatically if the temperature changes.
Corner Sharpness & Field Flatness
The superb field flatness is one of the main reasons why astrophotographers love the Samyang 135mm f/2. The combination and quality of the optical elements produce a truly sharp flat field from corner to corner.
Stars in the corner of the frame are just as sharp and undistorted as those in the centre.
The image below is one 80 second sub-exposure of the Flaming Star Nebula region in Auriga, which I shot using the Samyang 135mm f/2. This sub-exposure has had some basic levels and curves stretches applied to make things a bit easier to see, but otherwise, this is straight out of the camera.
Zooming into the corner of the image, you see pinpoint stars, which is exactly what you want to see in astrophotography images.

Stars remain sharp even in the corners of your images.
The fully processed image of the above Flaming Star Nebula is included earlier in this post.
To get this level of performance from a lens at this price point is exceptional.
Managing Vignetting at Wide Apertures
Vignetting, or the darkening of an image toward the corners, is common on fast telephoto lenses like the Samyang 135mm f/2. At its widest apertures, this lens exhibits noticeable vignetting, which can create distracting gradients in astrophotography images.
In astrophotography, vignetting results in ugly gradients in the corners of your image, particularly when you stretch the image to pull out faint details.
These gradients can be dealt with effectively by using flat calibration frames in your image stacking process. I would absolutely recommend that you include them as they can make a big difference to your final image.
Below is a typical flat frame I shot on an APS-C sensor at f/2; this image has been stretched again for clarity, but the vignette gradient is clearly visible in the corners.
The Samyang 135mm f/2 lens does suffer from vignetting but can be dealt with by taking flat calibration frames.
It is possible to reduce the amount of vignetting by stopping down your aperture to f/2.8 or f/4. However, it is not possible to remove it completely and maintain a useful wide aperture for astrophotography.
Therefore, you should always aim to take flat frames to help remove corner gradients. Trevor at Astrobackyard.com has put together a nice post on how to take flat frames that is well worth a read through.
Diffraction Spikes and Aperture Blade Effects
Inside the Samyang 135mm f/2, there are nine precision, rounded aperture blades, which closely approximate a circular aperture when combined. For daytime photography, this creates a beautiful bokeh effect of any objects out of focus.
As the aperture is not a perfect circle, the lens will produce diffraction spikes around the brightest stars in your image, and the effect becomes more apparent at smaller apertures.
Each aperture blade creates two diffraction rays 180 degrees apart, perpendicular to the edge of the blade. As there is an odd number of blades inside the lens, the 9 blades will produce 18 diffraction spikes in total.
Below is an example of this effect on bright stars. These two stars in the image are viewed at 100% zoom, and to highlight the effect, I have applied an aggressive curves stretch in photoshop.
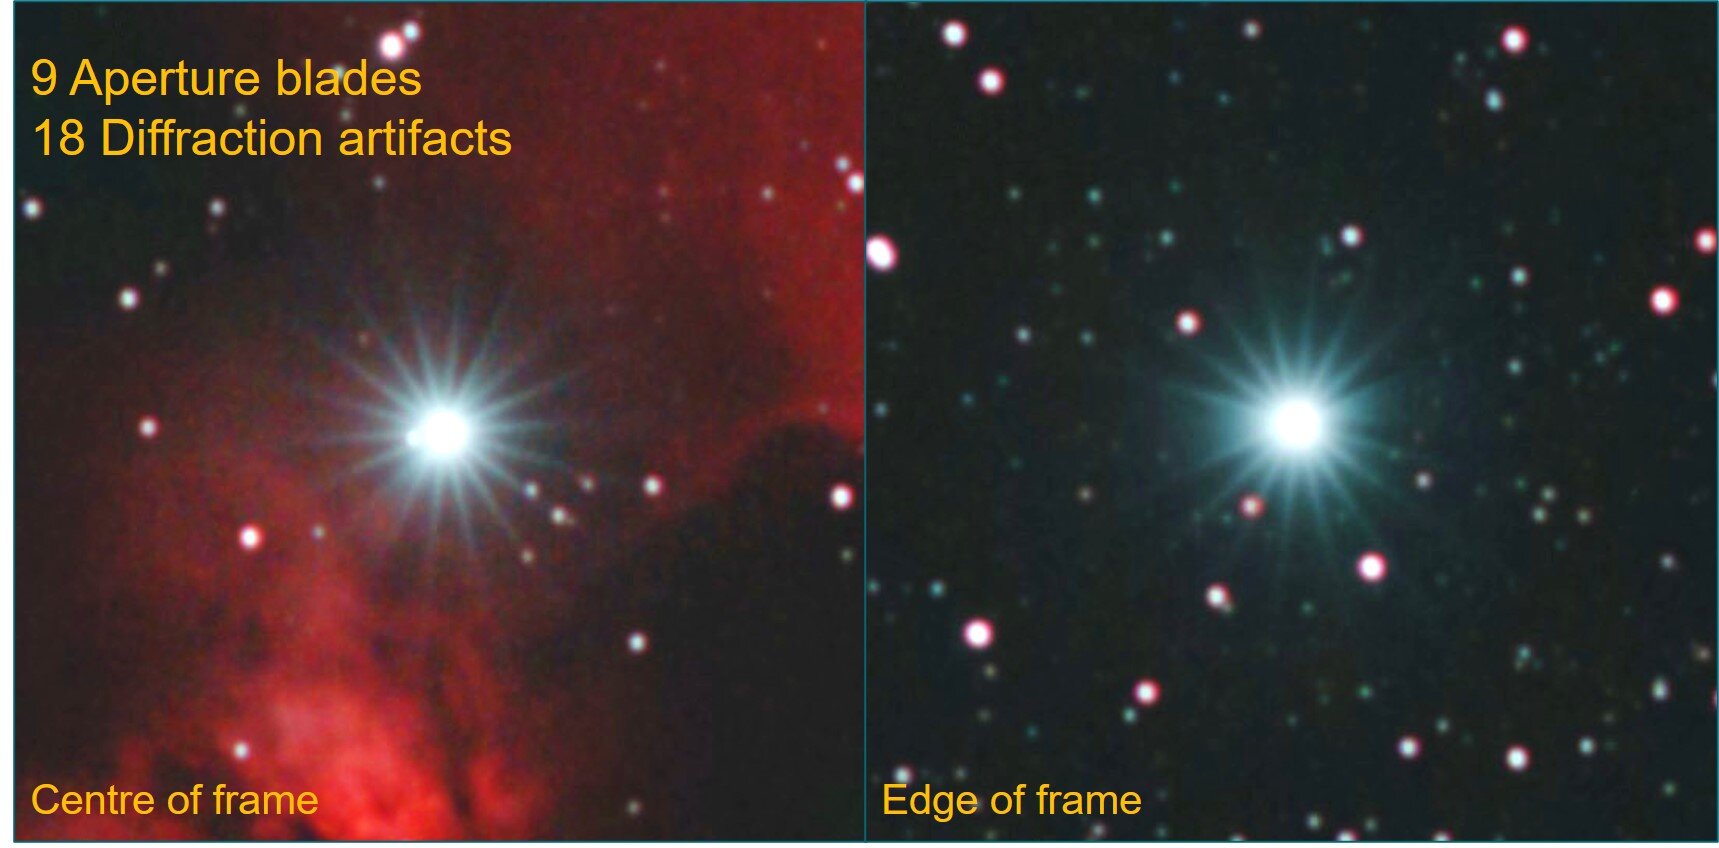
Non-circular aperture diffraction spikes are noticeable on bright stars.
In reality, the effect is only visible around bright stars and is relatively small in its extent. The two stars shown above are the bright stars from my Horsehead nebula image shown earlier in the post, and in my opinion, this effect does not spoil the overall image.
If you wish to remove this effect altogether, the best way to do this is to shoot with the aperture wide open at f/2. In this situation, the aperture blades are recessed under the lens casing, producing a perfectly circular aperture and no diffraction spikes.
There is a trade-off when the aperture is wide open, you will have a very narrow depth of field, making your otherwise perfect focus more susceptible to temperature drift, and the strong vignette present at f/2 will need to be dealt with.
My preference is to set the aperture to f/2.8 with my APS-C sensor to make sure my focus is spot-on and remains stable even as the temperature changes through the night. I can live with the small diffraction rays around the brighter stars; in some cases, I even prefer it.
Final Verdict on the Samyang 135mm f/2
The Samyang 135mm f/2 DSLR lens is fantastic for astrophotography. When paired with a simple star-tracking mount, this lens will transform your DSLR into a very capable and portable widefield astrophotography rig.
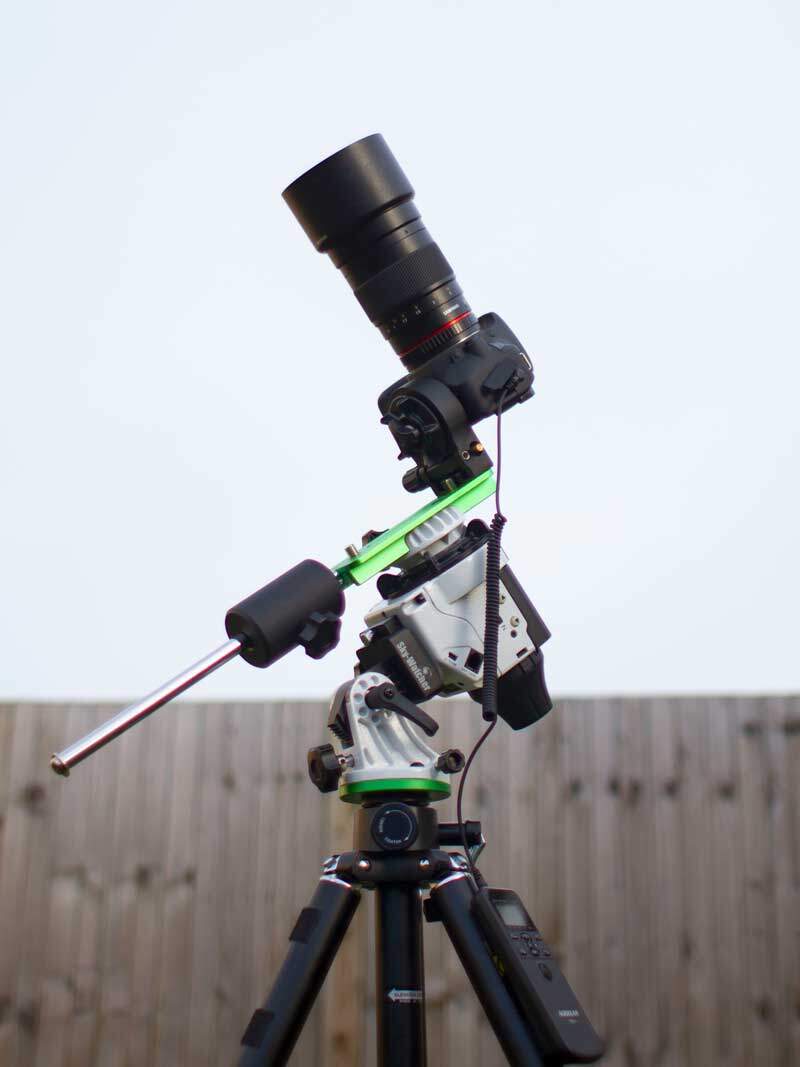
Ready to go! The Samyang 135mm f/2 lens on a Canon DSLR mounted to the Skywatcher Star Adventurer tracking mount; a very simple yet portable setup.
There are many positives to the Samyang 135mm f/2 lens; it has earned a solid reputation within the astrophotography community for producing high-quality astrophotography images.
Want to see what others are capturing with this lens? Take a look at some incredible community images over on AstroBin.
👉 Thinking of adding it to your kit? Check the latest price and availability on Amazon (affiliate link).
Pros
- A very fast lens with an f/2 maximum aperture, allowing you to capture fantastic astrophotography images with just a couple of hours of total exposure time.
- Well built and robust, with a handy included lens hood that doubles as an effective dew shield.
- The 135mm focal length offers a generous field of view, perfect for large deep sky objects.
- Produces a flat field with minimal distortion, even in the corners of the frame.
- Incredibly sharp images, enabling pinpoint star focus.
- Easy to handle on a simple star tracker mount — with good polar alignment, you can expect 2 to 3 minute-long sub-exposures.
- Straightforward to focus using live view or other common methods.
- Available for most DSLR mounts, making it accessible even for astrophotography beginners.
- Affordable, providing excellent value for the quality of images it delivers.
There are some negatives, but for the price point, I think these are minor issues when it comes to using this lens for astrophotography.
Cons
- Noticeable vignetting at wide apertures, especially on full-frame sensors.
- Diffraction spikes caused by the 9-blade aperture, which can be eliminated by shooting wide open — but this requires careful focusing and managing vignetting.
- No electronic communication with the camera, so image metadata will lack focal length and aperture info.
- No weather sealing — take care when shooting in damp or dusty conditions.
- Heavier than typical DSLR lenses (830g), which may affect balance on smaller mounts.
It’s worth noting that the fully manual focus and aperture controls are not a drawback for astrophotography — these features offer greater control and reliability in the field.
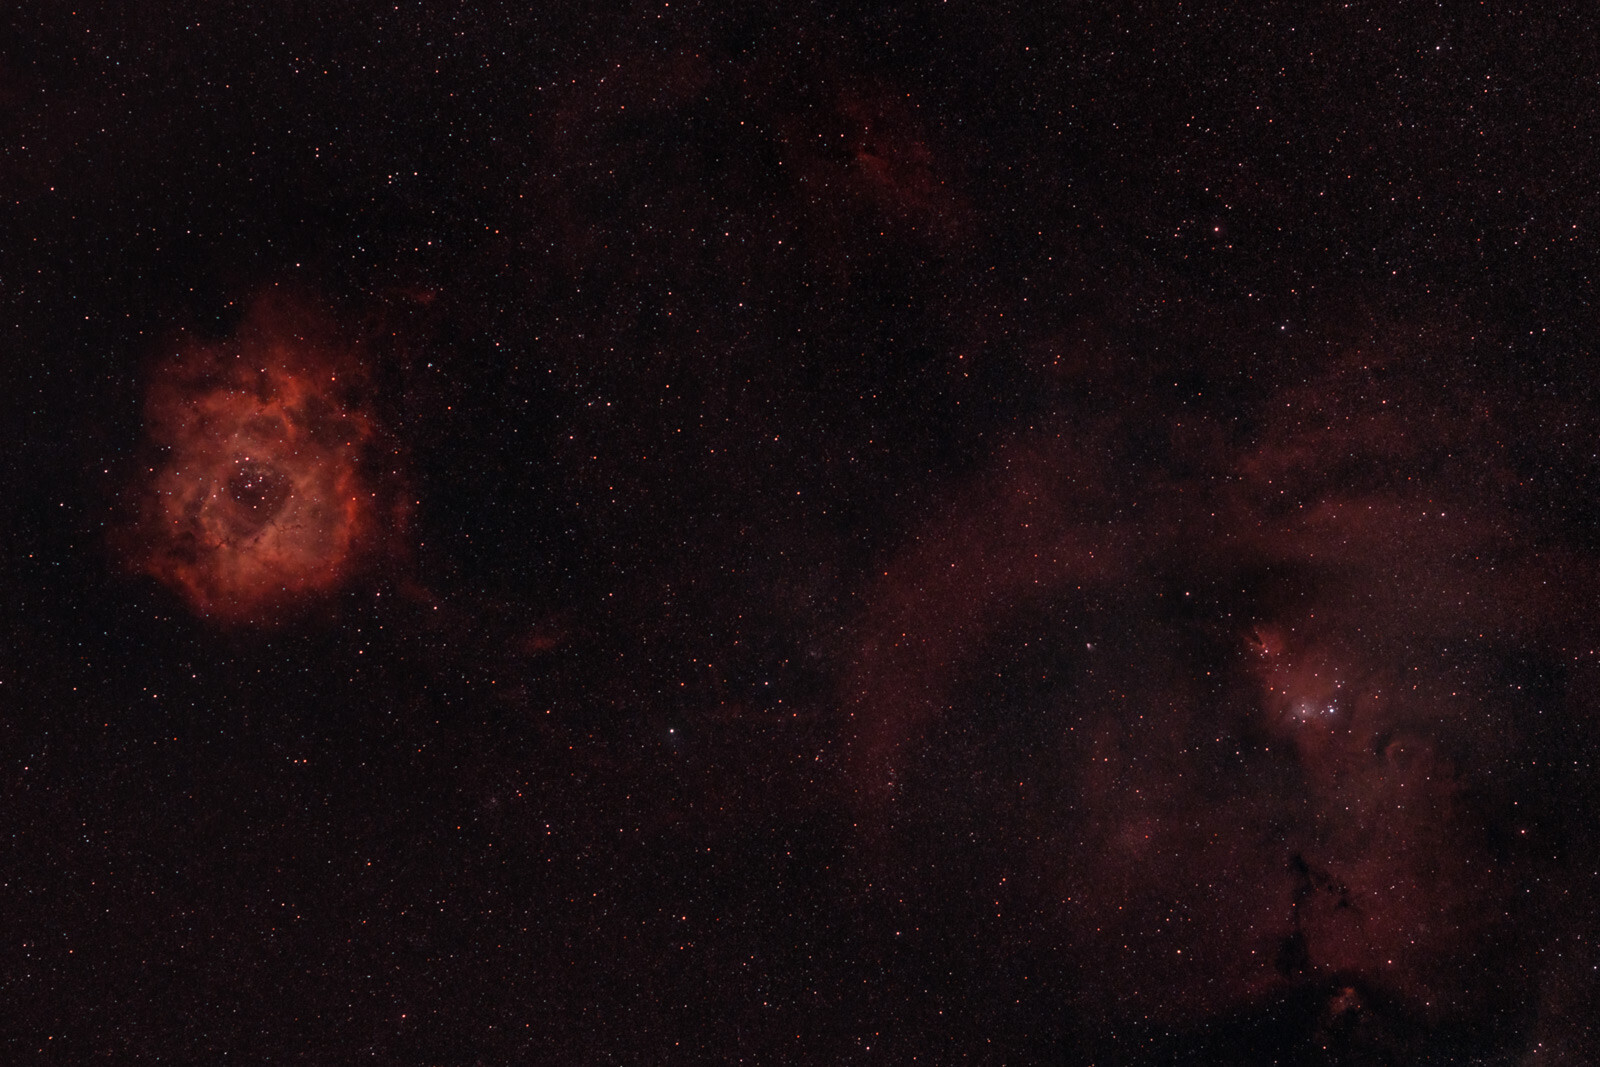
The Rosette and Cone Nebula in Monoceros is another interesting choice for the Samyang lens, by Mike Soulby © stellardiscovery.com
I use this lens frequently and still have many targets I want to photograph with it. Its portability makes it easy to bring to dark sky sites and set up quickly. If you’re considering getting into astrophotography, this lens deserves serious consideration, often ahead of investing in a new telescope.
If you enjoyed this post, please consider subscribing or leaving your feedback in the comments below.
17 Comments
Arie · October 25, 2021 at 2:11 am
Hi Mike
Thanks for a great article on the lens and it use, great pictures and list of targets.
Thanks
Arie
Mike_Soulby · November 2, 2021 at 10:25 am
Thanks Arie, I am glad you found it helpful.
Kathie · February 7, 2022 at 6:13 pm
Hi Mike, I just purchased the Samyang version of this lens to use on a Z6ii. Can you clarify – this lens can be used for simple astrophotography w/o any kind of tracking device? Also, what settings work to get results (ie. some of the nebulae you mentioned) It seems like one has to have a very short exposure before the star trails form. Photopills indicates probably < 2 secs. Thank you so much!
Mike_Soulby · February 12, 2022 at 9:03 pm
Hi Kathie,
Yes, it is absolutely possible to do this with short exposures. The key is to take lots of short exposures, perhaps upwards of 1000 or more. These photos are then stacked in a stacking program such as DeepSkyStacker .
Taking lots of photos improves the signal to noise ratio, this means you will be able to pull out more faint details of the deep-sky object when processing the image without the noise overriding the image.
You will be better off trying this first on some of the brighter deep-sky targets, such as the Orion Nebula (M42) or the Andromeda Galaxy (M31).
Some suggested camera settings:
– Set your ISO to about 1600 / 3200
– Set the maximum exposure according to the 1/500 rule or the NPF method outlined in Photopills for your camera and the Samyang lens’ focal length. This will be at most a couple of seconds before the stars will trail with this combination. It is best to take some test exposures to see if you are happy that the stars are not trailing excessively.
– I would keep the aperture wide as you want to capture as much light as possible, no smaller than f/4.0.
– To semi-automate taking this many images you will need an intervalometer that can connect to your camera. This handy gadget allows you to set your exposure length, the number of exposures, a short pause between each shot and allows you to be hands-free so you don’t have to keep pressing your camera’s shutter button. For the Nikon Z6 something like this https://amzn.to/3oIGrOS would probably be suitable, I have used a similar one successfully for my Canon 7D and 200D.
– Whilst you are taking the pictures you will need to periodically realign your tripod to keep up with the target. Try not to let the target move too far from the centre of your frame before you re-adjust so try to shoot in batches. The stacking software can handle the alignment of the individual frames so some movement between frames is OK.
Once you have all of your light frames (shots of the actual target) you will need to take some calibration frames: dark frames, flat frames and bias frames. These help to reduce thermal noise/hot pixels, gradients and camera read-noise respectively. You add all of these into DeepSkyStacker and it will help improve the final image by subtracting these noise artefacts from the stacked image. Once you have the stacked image you will need to open this in Photoshop to process and bring out all the faint detail in your final image.
Nico Carver at Nebulaphotos.com has a great video tutorial on exactly this subject of astrophotography with no star tracker. He goes into great detail from start to the final image, it is well worth checking out https://www.nebulaphotos.com/resources/m31/
This approach will hopefully get you started. Allowing you to capture some images of the brighter deep-sky objects. Once you get the hang of this and stacking images you will be ready to move to a star tracker where you will be able to reach sub-exposures of 2-3 minutes with the 135mm focal length.
Regards
Mike
Kathie O'Donnell · July 5, 2022 at 10:28 pm
Just wanted to thank you for your detailed reply. Found it today (late) as I have been ignoring the lens for awhile :). PhotoPills sure is an amazing app. Happy shooting!
Rod Henry · February 16, 2022 at 5:07 pm
Thanks for the review and the hints. I’m ready to buy one of these for my SONY cameras.
Mike_Soulby · February 16, 2022 at 8:35 pm
Thanks Rod, It’s a fantastic lens I am sure it will serve you well.
Scott Kuntz · May 7, 2022 at 12:19 am
I have purchased this lens and I have been testing it out. I am finding that the focus ring stop short of true infinity focus. Apparently this is a known issue. I can either send it back or remove the focus stop as described some places on the internet. Any insight or recommendations?
Mike_Soulby · May 10, 2022 at 9:25 pm
Hi Scott, thank you for your comment, I am sorry to hear that you having problems with your Samyang. I have not personally encountered this problem with the lens. I understand there may be a fix that you could try if you are comfortable with adjusting the lens yourself. However, if I encountered this issue of a lens not reaching infinity when attached to the DSLR camera model that it is designed to fit I would send it back for replacement or repair. I hope you are able to find a solution and are able to start using this wonderful lens.
William Smith · May 7, 2022 at 10:56 pm
I am really new to astrophotography so buying equipment and software is a big issue. While there are many articles about how good this lens is I am having a hard time with making a decision. The Sigma 135mm F1.8 has much better specs then the Samyang but there are no reviews of the Sigma for astrophotography nor are there any comparisons of the two lens. Your thoughts would help me and perhaps encourage you to do a side-by-side comparison. I have a Sony a7R III, Fujifilm X-E4, and the Canon EOS M6 II so I need to have a lens that can be used on all three cameras. Both lens with the Canon EF mount will satisfy that problem.
Mike_Soulby · May 2, 2024 at 10:00 pm
I think the big appeal of the Samyang lens is its cost, it really is a great entry level lens for astrophotography. I have had a quick look at the Sigma lens and it looks like a very fine lens indeed, but I believe for astrophotography the Samyang will in many cases perform just as well or at least well enough for astrophotography, especially as there are bigger things to contend with, such as polar alignment and accurate tracking. If you need autofocus then the sigma would win all the time but if you are happy with manual focus, which for astrophotography is not really an issue then you will be able to capture many great images with the Samyang. I am sure there are others that think differently and I would love to do a side by side by side comparison, but alas astrophotography is an expensive hobby and I have my eye on some other bits at the moment ;-). Good luck with whichever lens you choose.
Electro · September 18, 2022 at 4:40 pm
Hello,
I have the same RIG (well not the camera) but i have a Canon EOS 2000D a Samyang 135mm f2 an a SkyWatcher SkyAdventurer 2i
But in this configuration I cannot balance the mount
…
Mike_Soulby · October 25, 2022 at 9:43 pm
The SkyWatcher Star Adventurer is designed for this kind of setup so it is possible to achieve good balance on the right ascension axis. A tip would be to move the bulk of your mass towards the centre of rotation. i.e moving the camera towards the middle, the closer you are to the centre means that you don’t have to move the counterweight so far out to balance the camera; there will be plenty of range for the counterweight to move to achieve balance. One thing to watch if you do this is you can block the polar scope so move the camera as far towards the centre without blocking it if you use it for polar alignment. Also, be careful of cables that might be pulling on the camera, as you rotate the setup check that these cables are able to move freely as the setup rotates.
Mark Poole · January 28, 2023 at 2:09 pm
I’d like to shoot at F/3.2 or F/4 to increase the depth of field but don’t want the diffraction spikes. Have you considered or tried a step-down ring for the aperture?
Mike_Soulby · May 2, 2024 at 9:36 pm
Its an interesting idea, not something I have tried. If you find the diffraction spikes really distracting on brighter stars it would be an option. I don’t mind them too much, but depending on the image I may want to open the aperture all the way to f2 to remove them and just spend a bit more time ensuring my focus is spot on.
Steve Heise · January 20, 2024 at 2:39 pm
I also have the issue with infinity focus and am going to do the adjustment. I just don’t understand with such a simple fix available, how it could come from the factory this way. It’s a well known issue.
Mike_Soulby · May 2, 2024 at 9:39 pm
I am sorry to hear you are having this issue with your Samyang lens. I am also surprised it would leave the factory like this. It is not something i have personally experienced but can understand your frustrations. At least there is a fix available to allow you enjoy the great optics.