This post contains affiliate links. If you make a purchase through these links, I may earn a small commission at no extra cost to you.
Why Portable Power Matters for Astrophotography Rigs
Astrophotography often requires hours of continuous power, especially if you’re shooting deep-sky targets with long exposures.
When imaging from your back garden or driveway, supplying power to your rig usually isn’t an issue, but light pollution often is. Urban and suburban skies are flooded with artificial light that washes out fainter nebulae and galaxies. This is where dark sky sites become invaluable.
By travelling even just an hour outside of urban areas, you can gain access to darker skies that dramatically improve contrast, star visibility, and overall image quality.
But these darker skies rarely come with access to mains electricity. That’s where a portable astrophotography setup — one that’s fully self-powered — comes in.
In this post, I’ll walk through my current off-grid astrophotography setup, powered by the Anker Solix C300 — a compact yet powerful power station that offers several hours of reliable imaging time.
👉 If you’re considering something similar, you can check current pricing and availability on Amazon (affiliate link).

Compact yet powerful, the Anker Solix C300 is ideal for a low-power portable astrophotography setup.
My Low-Power, Portable Astrophotography Setup
I have been looking to build a portable astrophotography rig for some time now to make use of the kit I already had, but now rarely use as I have been mainly focusing on using my larger telescopes on a heavy-duty go-to mount, which are not ideal for transporting and setting up at dark sky locations.
I wanted to build a setup around the fantastic Samyang 135mm f/2 lens and already had an Astro-modified Canon EOS 200D and a SkyWatcher Star Adventurer star tracker, so I had the foundations of a grab-and-go astrophotography rig already.
Now, it is possible to run these together purely by using batteries that fit into them; however, I wanted more automation, more reliability, help with polar alignment, and help with finding faint targets. I also wanted a few extras running, such as dew heater bands and a guide camera (as it is possible to guide in right Ascension with the basic Star Adventurer).
This is why I decided to add the ASIAIR Plus, which acts as a central hub that allows me to power and connect everything neatly.
The ASIAIR also has in-built polar alignment routines that make polar alignment a breeze, and in built platesolving capability, which is a massive help when trying to find and align faint targets with the StarAdventurer manually.

My low-power DSLR portable astrophotography setup.
The full list of the astrophotography gear used in my grab-and-go rig is outlined below (contains affiliate links):
- Tripod – First Horizon 8115 2 Way Heavy Duty Tripod
- Star Tracker – Sky-Watcher Star Adventurer
- Optics – Samyang 135mm f/2 ED UMC Lens
- Astrokraken 3D printed mounting solution for Samyang 135mm (this allows me to mount a guide scope)
- Imaging Camera – Canon EOS200D (Astro Modified), powered with a dummy battery adapter that runs from an A/C supply
- Guide Scope – ZWO 30mm mini guide scope
- Guide Camera – ZWO ASI120MM Mini
- Lynx Astro dew heater bands (15cm band for guide scope, 30cm band for Samyang lens, fitted with RCA Socket to 2.1mm DC Male adapters)
- Controller – ASIAIR Plus
- Accessories such as a Vixen mounting rail, shorter 0.5m USB cables
Estimated Power Consumption
In order to find a solution that would fit my low-power astrophotography rig, I needed to estimate the likely power consumption once everything was turned on and running.
Below is a table of the items that need powering and the estimated power consumption of each item. Most of this was derived from product specifications or from other users’ experiences in forums such as Cloudynights or StargazersLounge, so some values are only approximate. I also included the connection and voltage requirements.
Item | Power Connection | Required Voltage | Power required |
|---|---|---|---|
Sky-Watcher Star Adventurer | USB Mini | 5V | <50mW |
Imaging Camera - Canon EOS200D | Dummy Battery Adapter | 7.4V | ~3W |
Guide Camera - ZWO ASI120MM Mini | USB C | 5V | ~2W |
Lynx Astro dew heater band (15cm) | RCA (fitted with 2.1mm DC Male to RCA Socket adapter) | 12V | 3W |
Lynx Astro dew heater bands (30cm) | RCA (fitted with 2.1mm DC Male to RCA Socket adapter) | 12V | 6W |
ZWO ASIAIR Plus (power required to run, provide WiFi, etc.) | 2.1mm DC Male | 12V | ~10W |
Total | ~24.05W |
In the future, I will add the ZWO Electronic Focuser and possibly move to the Star Adventurer GTi with full GoTo capability. Both of these additions would only slightly increase my overall power consumption.
It is worth noting that I am using an uncooled DSLR camera in this setup. The modified Canon EOS200D has been a very reliable camera for me and has helped me produce some great images.
It would be entirely possible to power a dedicated cooled astrophotography camera, such as the ZWO ASI 2600MC, however, the power required to cool the camera is up to a maximum of 36W (12V at 3A). This would more than double my power requirements, and I would have to live with either half the imaging time or look for a higher capacity power station.
What I Needed in a Power Station for Astrophotography
When looking for a power station, I had a few requirements in mind.
1) I wanted to be able to get a full night’s imaging (6-8 hours) in a dark sky location. Multiple nights would be a bonus, but the chance of not having access to an A/C outlet the next day to recharge is low, as my main intended use would be travelling locally to darker skies from my home. I also want to use it on holidays, but we usually have a base to stay, so recharging again is an option.
If I were more remote, then I would look into a solar panel for recharging, or even use my car to give it a boost.
Based on my estimate of power consumption, this would require a capacity of approximately 200Wh for an 8-hour imaging run.
2) I wanted a 12V DC output. This is more efficient than using the A/C to D/C converter for the ASIAIR, so potential to save a bit here.
3) I also wanted an A/C outlet to power my DSLR, as this runs at 7.4 volts, and the ASIAIR doesn’t have any option to convert to this voltage. Therefore, I needed an A/C outlet to use the dummy battery adapter for powering my DSLR. Having A/C outlets also makes it more versatile in case it is needed for everyday use.
4) Costs, I wanted something that offered good value, within a budget of about £250. The higher the Watt Hours (Wh), the better, but Power stations offering a capacity of more than 300Wh started to quickly exceed my budget constraints.
With these points in mind, there were a few options available to me (affiliate links).
- Jackery Explorer 300 Plus, Portable power station with LiFePO4 Battery 300W
- Anker SOLIX C300 Portable Power Station – 288Wh | 300W
- BLUETTI EB3A Portable Power Station | 600W 268Wh
Any of these would serve you well for a light compact power station for a low-powered portable astrophotography setup: they are all compact, have enough outlets for what I needed, have a similar capacity and fall roughly in the same price range.
In the end, for me, it came down to a bit of brand loyalty as I already owned a couple of very reliable Anker power banks for charging smaller devices like smartphones or tablets, so I went for the Anker SOLIX C300 Portable Power Station.

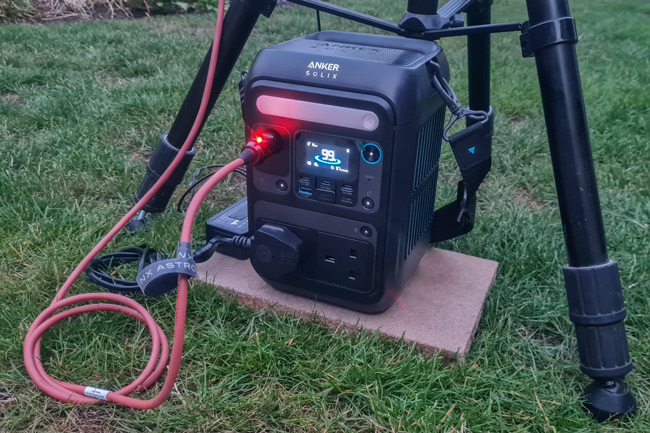
The Anker Solix C300 ready for its first night powering my portable astrophotography setup.
Fast Charging & Practical Use: Anker Solix C300 for All-Night Imaging
The Anker Solix C300 looks like an excellent fit for my portable astrophotography setup. With a 288Wh capacity, 12V DC output for the ASIAIR, and an AC outlet to power my DSLR, it ticks all the boxes I was looking for in a compact power station.
Specification | Details |
|---|---|
Battery Capacity | 288 Wh – enough for multiple charges of phones, laptops, and small devices |
Battery Chemistry | LiFePO₄ (LFP) – long cycle life (~3,000 cycles), safer & stable |
Output Ports (All) | 2 × AC outlets, 2 × USB-C PD (one is 140W bidirectional), 1 × USB-C (15W output only), 1 × USB-A (12W), 1 × Car port (12V/10A) |
AC Output Power | 300W continuous, 600W surge – supports laptops, small appliances |
Fast AC Charging | 330W input – recharges to 80% in about 50 minutes, full charge ~1.1 hours |
USB-C Input Power | One 140W USB-C port supports input & output – for fast USB charging |
App Control | Bluetooth + Wi-Fi via Anker App – monitor status and control remotely |
Weight | ~4.1 kg (AC version) – portable, suitable for camping and travel |
Temperature Range | 0°C to 40°C (32°F to 104°F) – suitable for most outdoor and indoor environments |
Specification | Details |
|---|---|
Battery Capacity | 288 Wh |
Battery Chemistry | LiFePO₄ (LFP) – (~3,000 cycles), safer & stable |
AC Output Power | 300W continuous, (600W surge) |
Fast AC Charging | 330W input – recharges to 80% in about 50 minutes |
USB-C Input Power | 140W USB-C |
App Control | Bluetooth + Wi-Fi via Anker App |
Weight | ~4.1 kg (AC version) |
Temperature Range | 0°C to 40°C (32°F to 104°F) |
Anker Solix 300C – Output Ports Details
- 2 × AC Outlets 300W (600W surge), pure sine wave
- 2 × USB-C PD 140W each (one can be used for charging)
- 1 × USB-C 15W output only
- 1 × USB-A 12W (5V/2.4A)
- 1 × Car Port 12V/10A
Plenty of outlets for all the equipment I need to power. The most important for me are the A/C outlets and the 12V/10A DC outlet.

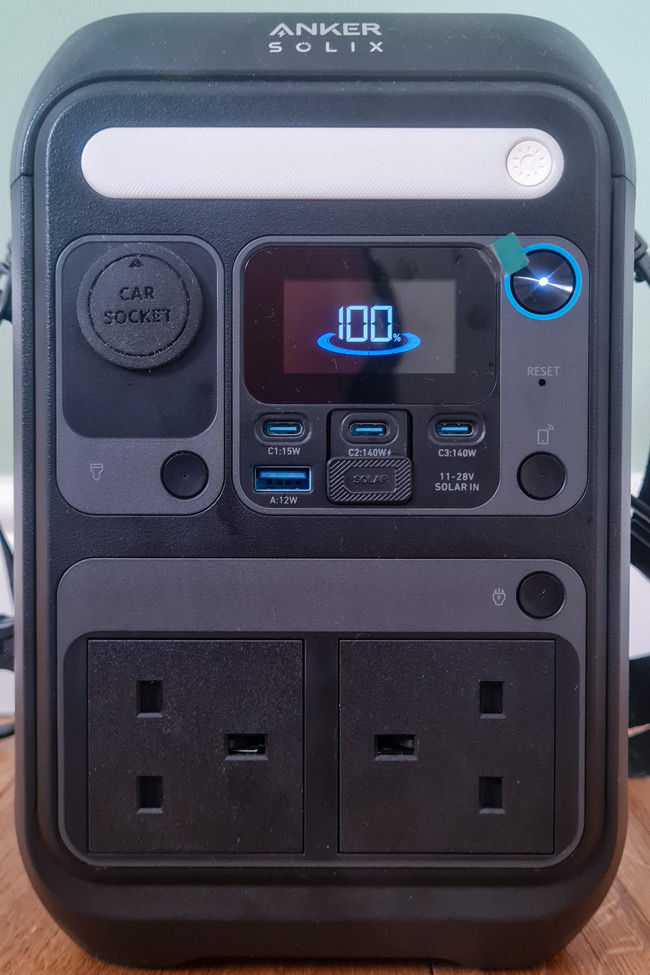
Plenty of outlet options with the Anker Solix C300.
Charging options and times (approximate)
- A/C input (on side) – recharge to 80% in 50 minutes
- USB-C PD input – recharge to 80% in 1 hour 48 minutes
- Solar Panel or Car Outlets – recharge to 80% in 2 hours 30 minutes
I have only used the A/C recharging from mains outlets in my home, and it really does seem to charge quickly.
There is also a useful app that lets you control the power station remotely from your phone. It can be connected via WiFi or Bluetooth. In the app, you can manually switch all of the outputs, and it also gives you a live power usage chart, very handy for monitoring and assessing your current power draw.
Its size and weight make it easy to transport to dark sky sites, and the fast recharge time means I can be ready for back-to-back clear nights. Based on its specs and my estimated power draw, I’m confident it will comfortably run my entire setup for a full night.
Full Night Power Test: Running a DSLR-Based Astrophotography Rig from the Anker Solix C300
My first opportunity to test everything was in mid-July in the UK. I did this from my back garden, and due to the long summer evenings, it wasn’t dark enough to get started until about 10 pm.
It had been warm in recent weeks in the UK, but this was the first noticeably cooler night for some time, with temperatures at the start of the evening around 20°C (68°F) falling to the mid-teens by the end of the night.

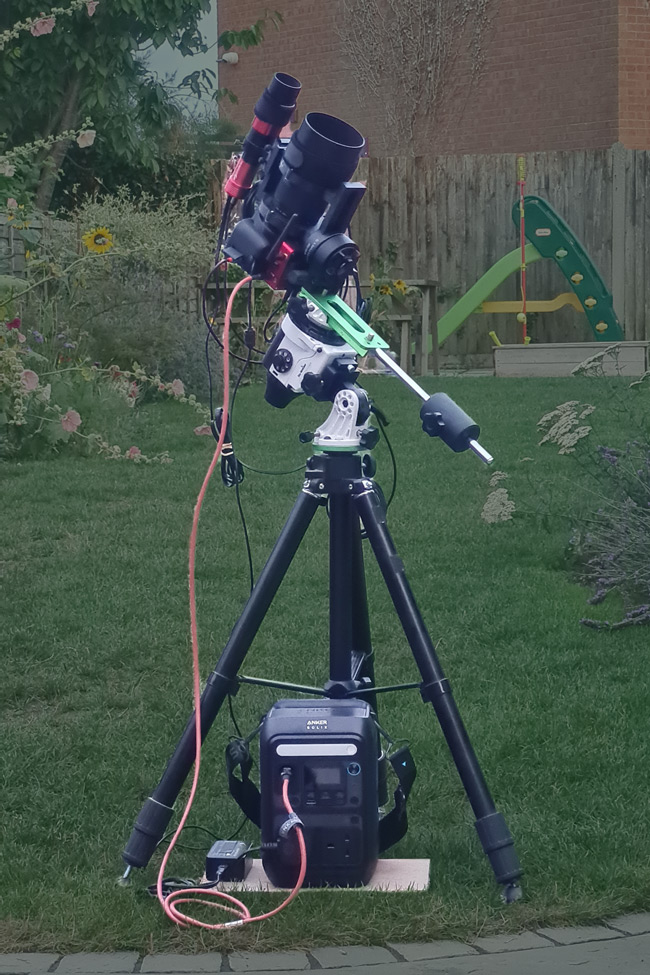
Simple power connections, using the ASIAIR as a power and connection hub.
I began with a 100% charge on the Anker Solix C300. By 10:10 PM, the entire rig was powered on and connected, with both dew heater bands set at 100% output.
After about 20 minutes of polar alignment (the Star Adventurer is a bit finicky in this area) and another 15-20 minutes framing, focusing and taking some test images on the Sadr region in Cygnus, I kicked off a 4-hour imaging run at 10:50 PM. At this point, the battery had dropped to 92%.
I was using 120-second exposures, the LeNhance clip-in filter, plus a short interval between frames. This brought the total time to about 4 hours and 15 minutes, scheduled to end just after 3 am. This coincided with the end of astronomical darkness, and I was playing things on the safe side for the first test.
Monitoring the power usage
Once everything was up and running, I checked the power usage on both the ASIAIR and the Anker Solix app.
The Anker app was showing that the power demand varied between about 14W and 18W as the camera was taking images, and gave a remaining usage time of 10 hours 30 minutes.

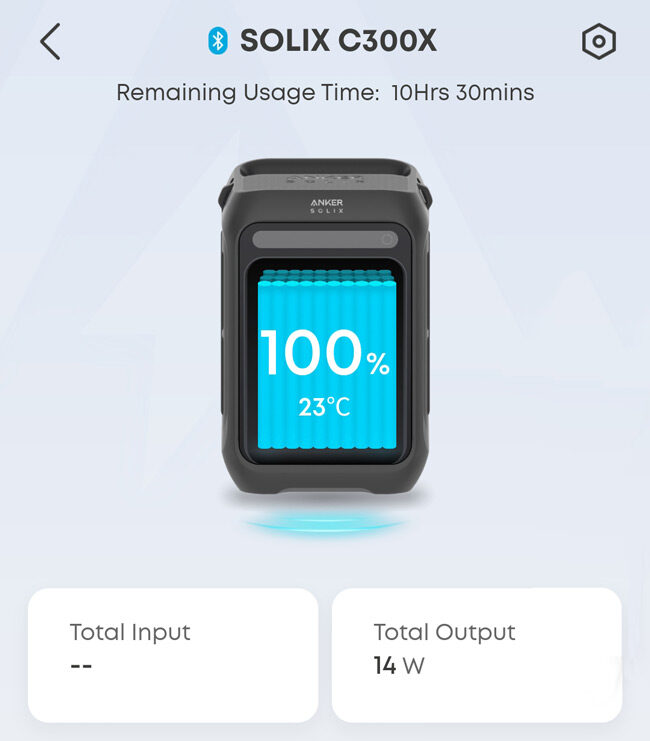
The Anker Solix app screen which displays real time power consumption information.
The ASIAIR status screen showed a similar power consumption value, again with some variation between about 13W and 18W; the ASIAIR was powering everything but the DSLR camera.
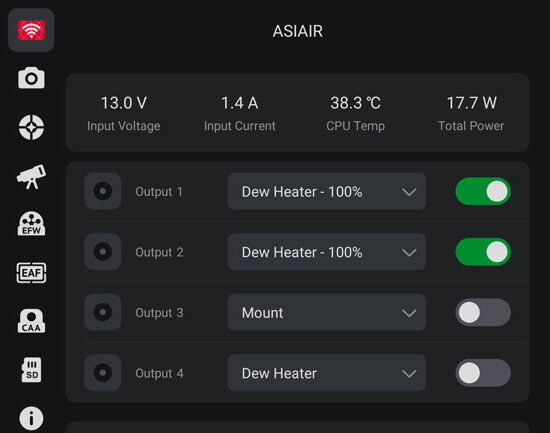
Both values were below my predicted value, so I was confident that it could deliver a full night of imaging with plenty to spare.
Once everything was up and running I left it and went to bed. I woke about 4 am and when I checked the imaging run had successfully completed, and everything was still running. i.e. ASIAIR still powered up, dew heaters still on, mount still tracking etc.
The charge had dropped from 100% to 62%.
I stopped the mount tracking to avoid any collisions and then went back to bed, but kept everything else powered. Upon waking again a couple of hours later, it was now about 6:30. I checked the battery level again, and it was now reporting 45%.
Below is a rough summary of the remaining charge at various points through the night. Please note I was half asleep, so timings are approximate.
Time | Actions | Charge Remaining | Remaining Capacity |
|---|---|---|---|
22:00 to 22:10 | Setup, connection and power-on | 100% | 253Wh |
22:10 to 22:45 | Polar alignment, focusing, framing and test exposures | 92% | 230Wh |
22:45 to 04:05 | 4:15 hour imaging run, 120 sec exposures x 120 + pause interval completed at 03:05. StarAdventurer stoppped at 04:00 | 62% | 178Wh |
04:05 to 06:30 | ASIAIR, Dew heaters and guide camera are still running to continue the power station test | 45% | 129Wh |
06:30 | All powered down | 45% | 129Wh |
Overall, I was very pleased with the Anker Solix C300. I had successfully powered everything and still had plenty of charge left at the end of a successful imaging run.
Below is a chart showing power consumption over time, alongside my estimated usage.
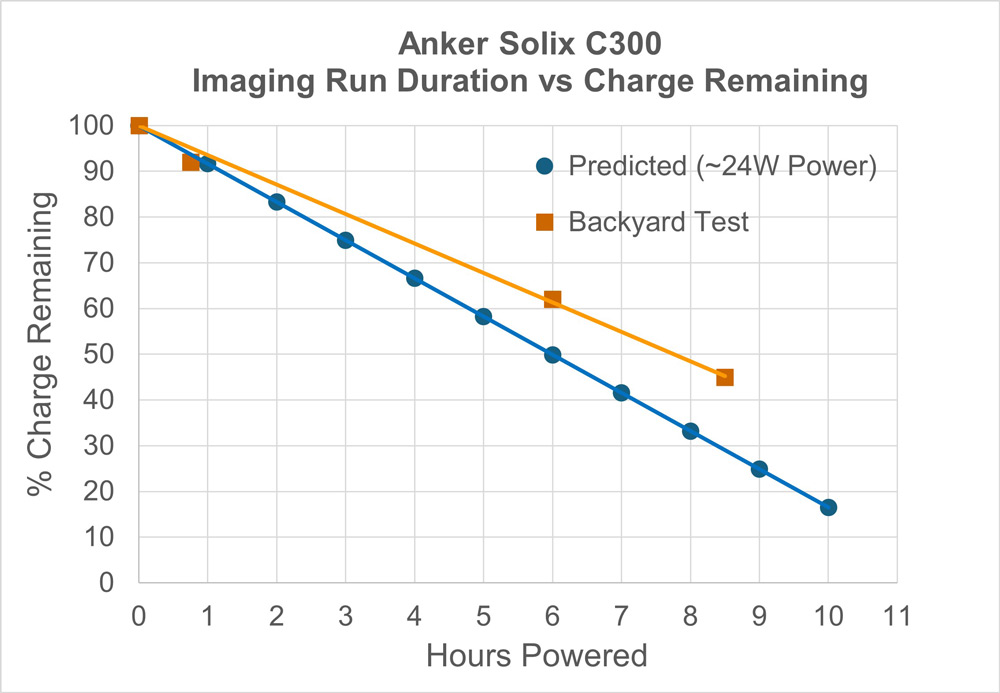
This is a simplified graph and doesn’t account for the voltage drop that occurs as a LiFePO₄ (LFP) battery approaches full discharge. While the Solix C300 handled the load without issue, it’s generally best practice not to discharge LFP batteries below 20% to preserve performance and extend overall lifespan.
Ultimately, at the end of the night, I had 45% remaining. I could probably have run it for another couple of hours safely. This performance also bodes well for slightly colder nights, which can be more demanding on battery performance.
✅Total runtime: >8 hours
✅ Power remaining: 45%
✅ Able to easily connect and power all equipment
✅ No voltage drops or reboots
This performance easily met my requirements and expectations for my portable astrophotography setup.
Test Image – Sadr Region in Cygnus
Below is the image I captured of the Sadr region in Cygnus during the first field test.
While the Anker Solix C300 comfortably powered the rig for over four hours, intermittent cloud cover meant I only ended up with about 1 hour and 50 minutes of usable data.
That said, the Samyang 135mm f/2 lens (used at f/2.8) is fast enough to deliver decent results even with limited exposure time, one of the key reasons I wanted to build a portable astrophotography setup around it.
Final Thoughts: Is the Anker Solix C300 Right for Your Portable Astrophotography Setup?
After planning and running a full night of imaging using the Anker Solix C300, it’s clear that this power station is more than capable of supporting a low-power DSLR-based astrophotography rig.
It delivered stable power throughout an entire imaging session — running the ASIAIR Plus, 2x dew heaters, star-tracker, guide camera, and a DSLR, with charge to spare. For setups like mine, it strikes a great balance between portability, performance, and cost.
If you’re building a compact, off-grid rig for dark sky imaging — especially one based around a DSLR, star tracker, and lightweight guiding — the Solix C300 offers enough capacity for a full night of imaging. It’s compact, has plenty of outlets and delivers stable operation, making it an excellent choice for astrophotographers with similar setups.
👉 If you’re building a similar DSLR-based rig and want a compact, reliable power solution, you can check current pricing for the Anker Solix C300 on Amazon (affiliate link).
That said, if you’re running a cooled astro camera (like the ZWO ASI2600MC or similar), power requirements will be higher. In that case, you should still get several hours of imaging time from the C300, but something with more capacity, like the Anker 535 PowerHouse (512Wh) or a comparable model from Bluetti or Jackery, may be a better fit.
I’ll update this post with more field testing in the future when conditions allow, including performance during cooler nights and with longer imaging sessions. For now, though, I’m confident this setup will be a reliable companion for trips to darker skies, whether it’s an hour from home or on future holidays.


1 Comment
Malcolm White · February 9, 2026 at 5:23 pm
Excellent report that covers much relevant detail with clear description for any off-grid compact astro imaging rig.