How to get started in Astronomy

Have you ever stood under a star-filled sky amazed by the scale and beauty of it all? Have you ever wanted to pick out the constellations or name the brightest stars? What about the planets?

The night sky is full of wonders. If you are just starting out in astronomy it can be difficult to know where to start. This post outlines several helpful suggestions that you can use to help get started in astronomy.

1. You don’t need a telescope

Don’t rush out and buy a telescope just yet. I know it can be tempting to think that you need a telescope if you want to be a stargazer, however, I can assure you that there is enough to see and learn without any equipment at all.

If you haven’t taken the time to learn and understand the night sky first, then a telescope might not be the best investment at this stage.

All you need for astronomy is your eyes, a good astronomy book or star chart, a clear starry night and some patience.

2. Be prepared to study

Even if you just want to be able to identify the planets or point out some of the easy-to-identify constellations to your family and friends you will need to study and learn them. Not only will you need to find out what they look like or where they are in the sky, but also when you can see them.

Astronomy is also a vast subject: stars, planets, comets, asteroids, dwarf planets, galaxies, nebulae, the moon and even the Earth. Each topic in itself is vast. Professional astronomers often specialise in just one of these topics for their entire careers and even then, there will always be more to learn.

There are no shortcuts to building a solid understanding of the night sky. It takes time, you will sometimes be frustrated that you can’t find what you are looking for, or the weather obscures your view of a rare astronomical event.

Most of what you learn will also need to be self-taught: reading books and websites, poring over star charts and Moon maps.

Most importantly you need to spend time outside under the night sky putting everything into practice.

3. Astronomy books

A really good place you can start is with some good general astronomy books, so I would recommend a trip to your local library.

Borrowing and reading astronomy books from the library will give you a good indication of whether astronomy is something that you wish to take further without needing to spend money on books you might never get around to reading.

Try and find books that cover some of the following topics.

  • Information about the Earth and how your location on it affects what stars and constellations you can see.
  • How the seasons affect what stars and constellations you can see at different times of the year.
  • What the celestial sphere is and how the stellar coordinate system works (right ascension and declination).
  • The movements of the Moon and descriptions of the Moon’s phases.
  • Descriptions of how the planets’ orbital positions in the solar system affect how and when they can be viewed from Earth.
  • What the ecliptic is and why many objects in the solar system are positioned near it?
  • Explanation of the object brightness scale and how the stellar magnitude system works.
  • Details of the Messier catalogue of deep sky objects, find out where the easiest and brightest ones are.

This might seem like a lot but you can break it down into manageable sections and tackle just one topic at a time slowly building up your knowledge.

4. Astronomy magazines and periodicals

A great way to keep up to date with the latest astronomy news and upcoming events is to subscribe to an astronomy magazine.

It is also a great way to maintain your interest and motivation as you will receive a regular dose of astronomy right to your door. They are also very accessible, aimed at both novice and experienced astronomers alike.

Every time I receive my monthly astronomy magazine subscription I am eager to read the latest news and articles. Even if I have had a busy week or month, without much time for astronomy, I am always happy to see the latest edition land on my doormat.

5. Charts, Maps and Planispheres

Star Chart

Another very useful tool is a star chart or star atlas. You can scan over a star chart in much the same way as you would scan the night sky. You can navigate between constellations seeing where the brighter stars are, how they lead or point towards other constellations and where any interesting objects, such as nebulae and star clusters, are located within each constellation.

Many astronomy books will contain star chart pages towards the end of the book, often going into detail about the individual constellations.

My preference is for a large foldout star chart, this will give you a very detailed view of all the constellations and how they are positioned relative to each other.

Moon map

Due to its brightness in the night sky, the moon is an obvious target for astronomers.

Even with the naked eye, it is possible to identify many features on the moon’s surface. These include the darker areas known as Lunar Maria. These large flat areas are easy to spot and can be named and identified by studying a good Moon map.

13 day old moon, full moon, moon map

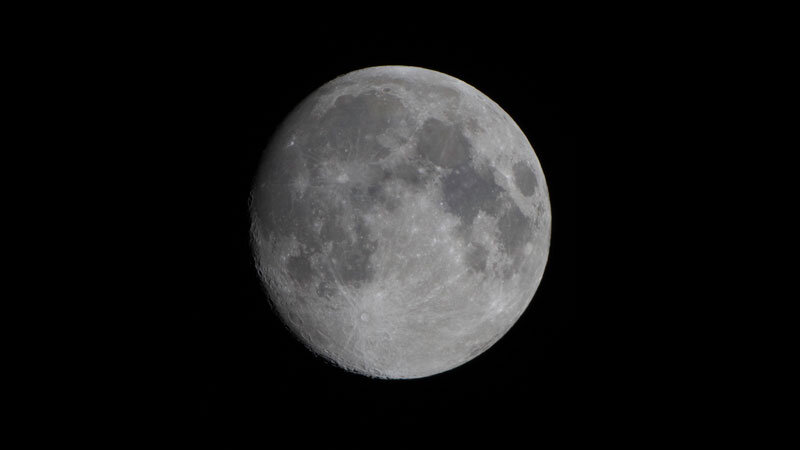
13 day old Moon by Mike Soulby © stellardiscovery.com

You should learn and understand the moon’s movements and phases during its 28-day orbit (known as a lunar month). It is useful to know when the moon will be visible in the sky as it can have a significant impact on what other objects can be viewed. At Full Moon its brightness will drown out the light from the faintest stars and deep sky objects.

Even with the naked eye it is possible to identify a number of features on the moon’s surface.

With a pair of binoculars, the Moon will reveal many more of its features and a Moon map is a great way to learn what these are. You should pay particular attention to the boundary between light and dark, known as the terminator.

Features near the terminator are particularly prominent due to the long shadows cast by the Sun. As the Moon moves through its phases you can view different features along the terminator each night.

Planisphere

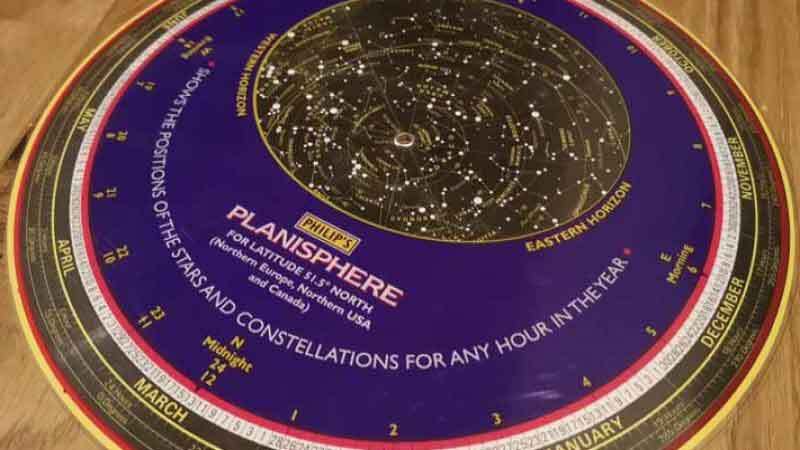
You should also consider a Planisphere. This will help you to find out what stars and constellations are visible on any given date and at a specific time of the night.

Planisphere

Planisphere 

There are planispheres available for your specific viewing latitude. I use one suitable for a latitude of 51.5° North, which covers Northern Europe, Northern USA and Canada.

You simply rotate the top disc until your target time and date line up. The planisphere will then only show the stars visible to you at that time and on that date.

Once set you can hold the planisphere upside down above your head and orient it to match your local eastern and western horizons. The stars and constellations visible in the window will now match what should be visible to you in the night sky.

6. Online astronomy resources

We are very lucky to have access to a wide range of excellent online astronomy resources and mobile phone apps. I like to use these online resources in addition to all of the other great resources already listed.

There are so many excellent astronomy websites on the internet it would be impossible to list all of them. However, below are a few suggestions for you to check out.

Popular astronomy websites such as:
Sky and Telescope
Astronomy Now
EarthSky.org
Space.com

Community astronomy forums, where you can interact with other astronomers from all over the world. Sharing and gaining tips about general astronomy, observing, equipment and upcoming astronomical events.

The following astronomy forums are well worth a closer look

Cloudy Nights Forums
Stargazers Lounge

Mobile phone apps such as Sky Safari or Stellarium allow you to simply hold up your phone to the night sky for instant identification of stars and planets.

You can download either of these apps for Android or iOS below.

Sky Safari 

by Simulation Curriculum Corp.


Sky Safari – Andriod
Sky Safari – iOS

Stellarium Mobile Sky Map 

by Noctua Software


Stellarium – Andriod
Stellarium – iOS

7. Consider a pair of binoculars

If you are new to astronomy, I would absolutely consider buying a good pair of binoculars.

A pair of 10×50 or 7×50 binoculars would be a sound investment for any beginner. The first number represents the magnification level, and the second number is the diameter of the main objective lens.

An objective lens with a diameter of 50 mm will give you nearly 70 times more light-gathering area than the naked eye (assuming a 6 mm fully dark-adapted pupil).

This will take you from being able to view only 2000 to 3000 stars with the naked eye to over 100,000 stars (if you have dark skies and no light pollution). This is a massive jump in terms of what you will be able to see.

Other than pure light-gathering power there are several other reasons why investing in a solid pair of binoculars will be helpful.

  • Binoculars are great value for money.
  • No setup time.
  • Simply point them at what you want to view.
  • Binoculars produce an upright image so they can also be used to view everyday scenes.
  • A wide field of view compared to a telescope makes finding things much easier.
  • Great way to learn how to hop between stars and constellations
  • Good eye relief and large exit pupil, i.e. no squinting and both eyes are used which means comfortable viewing.
  • Much larger light-gathering power than the naked eye.

The wide field of view offered by binoculars makes idle scanning of the night sky a real pleasure. Simply scanning your binoculars over the constellations of Cassiopeia and Perseus will reveal rich star fields and several open clusters.

The Pleiades cluster in Taurus is a delight as the entire cluster will be in your field of view at the same time. You will now be able to more easily see deep-sky objects such as the Andromeda galaxy (M31) and the Orion nebula (M42).

Many of the objects in the Messier catalogue of deep sky objects are within the reach of a good pair of binoculars.

Binoculars make idle scanning of the night sky a real pleasure

There are specialist binoculars available such as 15×70 mm or even 25×100 mm but these can be very heavy to use and hold still with your arms. The higher magnifications will almost certainly mean that you will need to use them with a tripod to get any sort of stable image.

I get lots of enjoyment out of the pair of 10×50 binoculars I own and would highly recommend that you start with something similar. A really helpful resource for binoculars for astronomy is the BinocularSky website and I would recommend taking a look at it before you make any purchases.

8. Have goals

When you first start out it is important to get into a routine of planning your observing sessions. Make a list of targets that you would like to see and check that you can view them from your current/planned time, date and location before you head out.

At the very beginning, you can simply start by learning where your local compass points are, i.e. North, East, South and West. This will help you to orientate yourself.

Learn one constellation at a time: start with some of the more obvious ones, such as the Big Dipper asterism in Ursa Major. From this one constellation, you can start to link to other nearby constellations, such as Ursa Minor and the North Star, Cassiopeia, Boötes, Auriga, Leo and more…

Learn one constellation at a time

You can challenge yourself to find a faint nebular or galaxy with a pair of binoculars or aim to follow the planets for a few weeks as they move against the fixed background of stars. 

The more often you challenge yourself to find new and interesting objects, the more quickly you will begin to fully appreciate the night sky. 

9. Make observing notes

I would also recommend taking notes. It is a good idea to document and sketch what you see and how it made you feel when you saw it.

When you make the effort to write down descriptions or sketch what you are looking at the extra concentration will make you see much more detail that is often missed with a casual glance.

Along with your observing notes, you should also record your location, time, date, local weather conditions, seeing conditions, transparency of the sky, the amount of light pollution, phase of the moon and magnitude limit.

The best part about taking notes is looking back on them in a few years and reliving the first time you spotted an elusive nebular or saw the moons of Jupiter dance around over the course of a few nights.

10. Make the most of clear nights

If you live in a place where you are in a constant battle with the weather for good viewing conditions, then you need to be ready to make the most of clear skies when you get them.

I live in the UK and the Gulf Stream constantly brings in new weather systems, often with lots of clouds, wind and rain so I am in a constant battle for clear skies.

If you live in a town or city, then you should drive away from light-polluted skies if possible.

Driving only a few miles away from urban areas can make a huge difference to what you can see. If you can do this you will be able to see more stars, more deep sky objects and possibly the Milky Way, as a result, you will get much more enjoyment out of your observing sessions.

To find out where the darkest skies are in your area you can use this light pollution map.

Driving only a few miles away from urban areas can make a huge difference to what you can see.

Once you are in a dark location you will need to wait for your eyes to adapt to the dark. It can take up to half an hour for your pupils to fully dilate.

Try to avoid bright lights or screens (such as your phone) as they will destroy any dark adaption your eyes have gained. Use a red light if you need to read a star chart or moon map. Red light does not affect your night vision as much as white torchlight or a bright phone screen.

I like to use a head torch with a red light function, this way I can keep my hands free to handle star charts or identify my telescope eyepieces.

If you are using a stargazing app on your phone then set the display to night mode, this will turn everything on the screen red.

11. Patience

Now I am not trying to put you off, but, you should understand that the pictures you see in astronomy books or news articles showing vivid colours of nebular filaments, glowing galaxies and large images of planets are not what you are going to see with your eyes, through binoculars or even through a small or medium-sized telescope.

These images use very long exposures. This allows the camera to gather light over a long time from objects that are much fainter than we can see.

Camera sensors and film are also much more sensitive to colour in low light conditions than our eyes. These objects are just not bright enough to activate the colour-sensitive cone cells within our retinas. As a result, many of the objects you look at will only ever appear as grey smudges and any colour in the planets will be difficult to spot.

If you want to see awesome images, like the image of the Orion nebula below, then you are best looking on the internet or in a book.
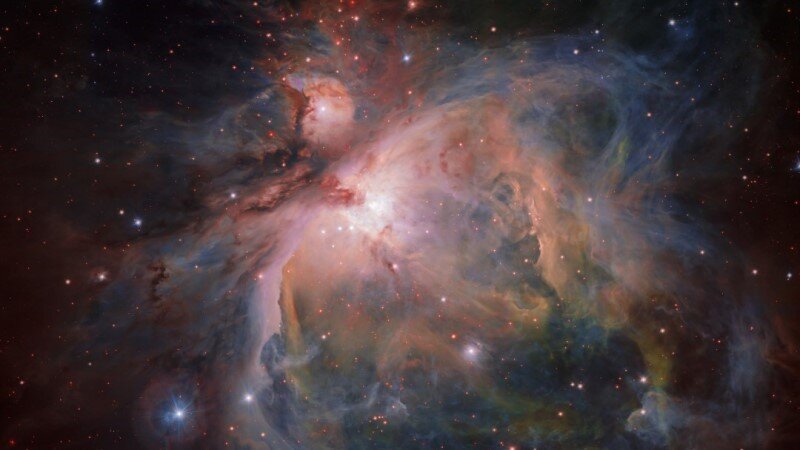
Space agency mission galleries, such as the NASA or ESA missions’ pages are great places to browse through some mind-blowing images. If these are the kinds of images that you are hoping to see by taking up amateur astronomy, then this hobby probably isn’t going to be for you.

Unfortunately, there are no shortcuts to building a solid understanding of the night sky. It takes time and quite often you will be frustrated that you can’t find what you are looking for or the weather will obscure your view of a rare astronomical event, such as a solar or lunar eclipse.

Over time, however, you will notice that things get a little easier, and you will start to realise how much you have learnt. This is especially noticeable when you are describing the night sky to friends and family.

One of the best parts of amateur astronomy is being able to observe objects that are inconceivably far away, whilst trying to make sense of your place in the universe.

This is why spotting a new object for the first time after having learnt how to navigate to it from nearby stars can give you a real buzz, even if it still only appears as a small fuzzy grey patch in binoculars.

Summary

  • All you need to get started are your eyes and a clear night.
  • Astronomy is a hobby that needs to be studied patiently.
  • Start charts, Moon maps and planispheres can all help you navigate the night sky.
  • Use online resources and star finder phone apps to reinforce your learning and knowledge.
  • Consider investing in a good pair of binoculars.
  • Try to set yourself some goals and targets to aim for.
  • Take notes and make sketches to develop your observing skills.
  • Make the most of clear nights, and drive to darker skies if you live in a city.
  • Be inspired by awesome images from books and the internet, but don’t expect to see these kinds of views through your eyes or even a telescope.
  • Have patience, there is a lot to see and learn in astronomy.
  • Finally, and most importantly, have fun!

I hope that you can use some of the ideas in this post to help develop your astronomy knowledge and stargazing abilities.

Please feel free to leave comments or other suggestions on how to get started in astronomy in the comments below.

I would love to hear your thoughts and experiences, especially for anyone who is just starting on their journey into stargazing.


0 Comments

Leave a Reply

Your email address will not be published. Required fields are marked *

This site uses Akismet to reduce spam. Learn how your comment data is processed.